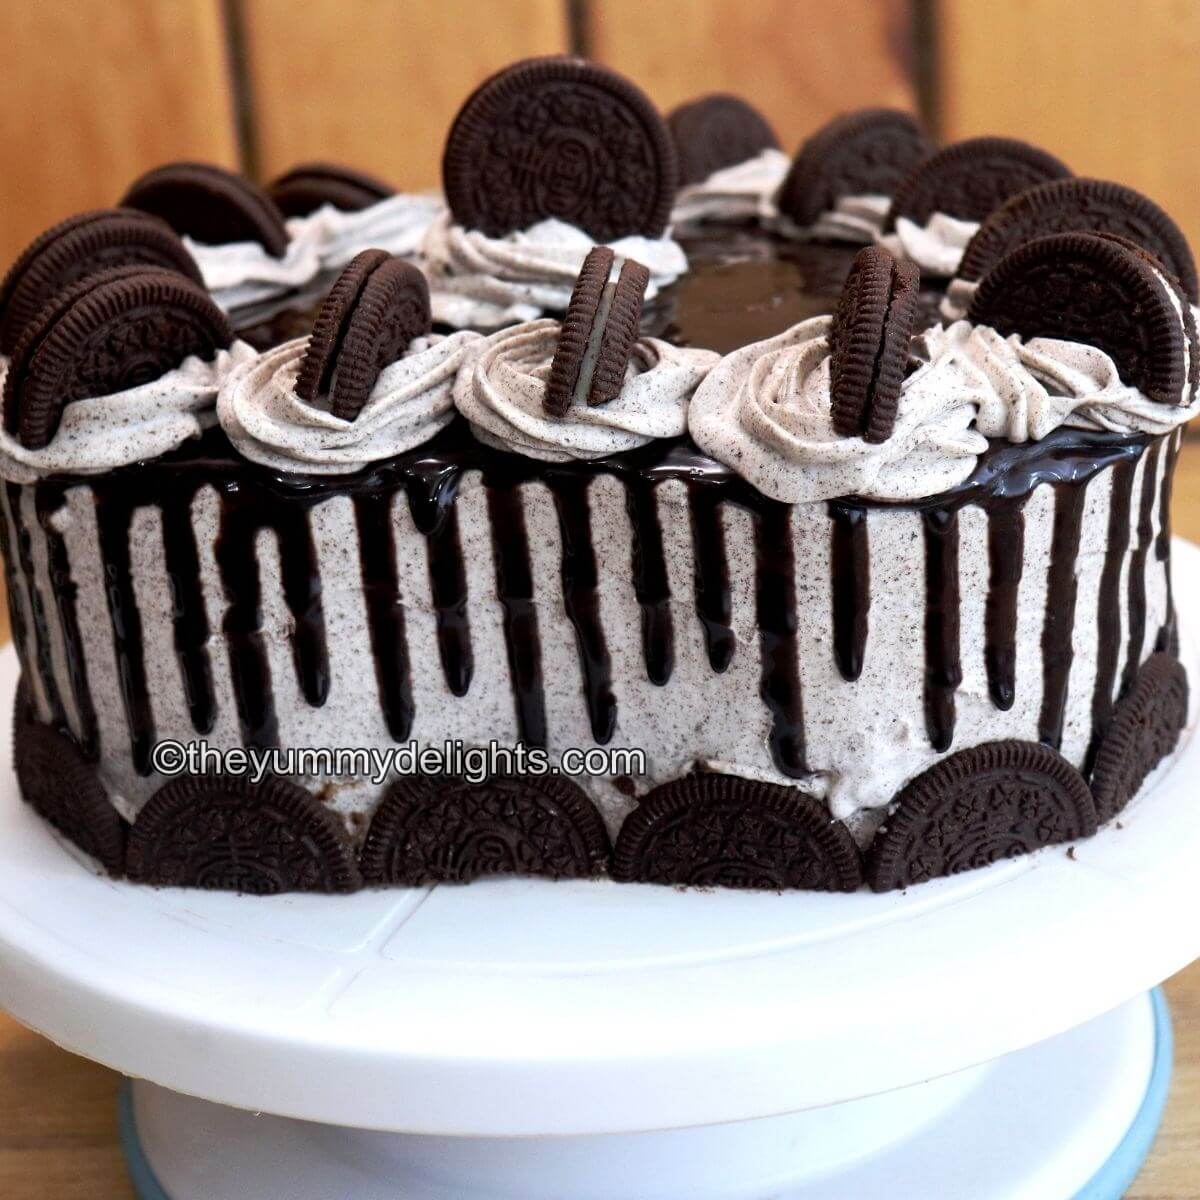
This delicious chocolate Oreo cake is made with layers of moist chocolate cake, enveloped in a light and airy Oreo whipped cream frosting. Rich dark chocolate ganache and Oreo cookies create a delightful textural contrast - smooth, crunchy, all delicious. Ideal for birthdays or celebratory occasions, this eggless oreo cake bursting with Oreo Cookies 'n Creme flavor is sure to impress.
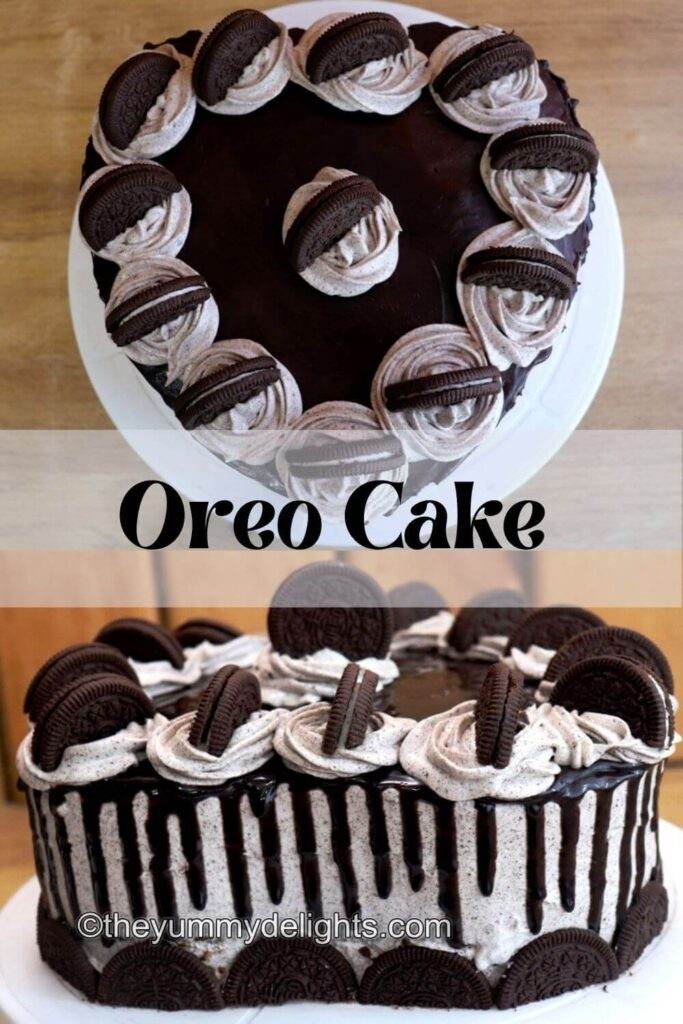
If your kids are Oreo lovers like mine, this chocolate oreo cake recipe is just for you. I made this chocolate oreo cake on my daughter’s birthday. Moist chocolate cake layered with this incredible frosting then finished with a luxurious dark chocolate ganache. Let's see how to make this chocolate cake with oreo.
How to make Chocolate Oreo Cake
- Bake a chocolate cake. You can use this chocolate cake recipe.
For making Oreo Whipped Cream Frosting
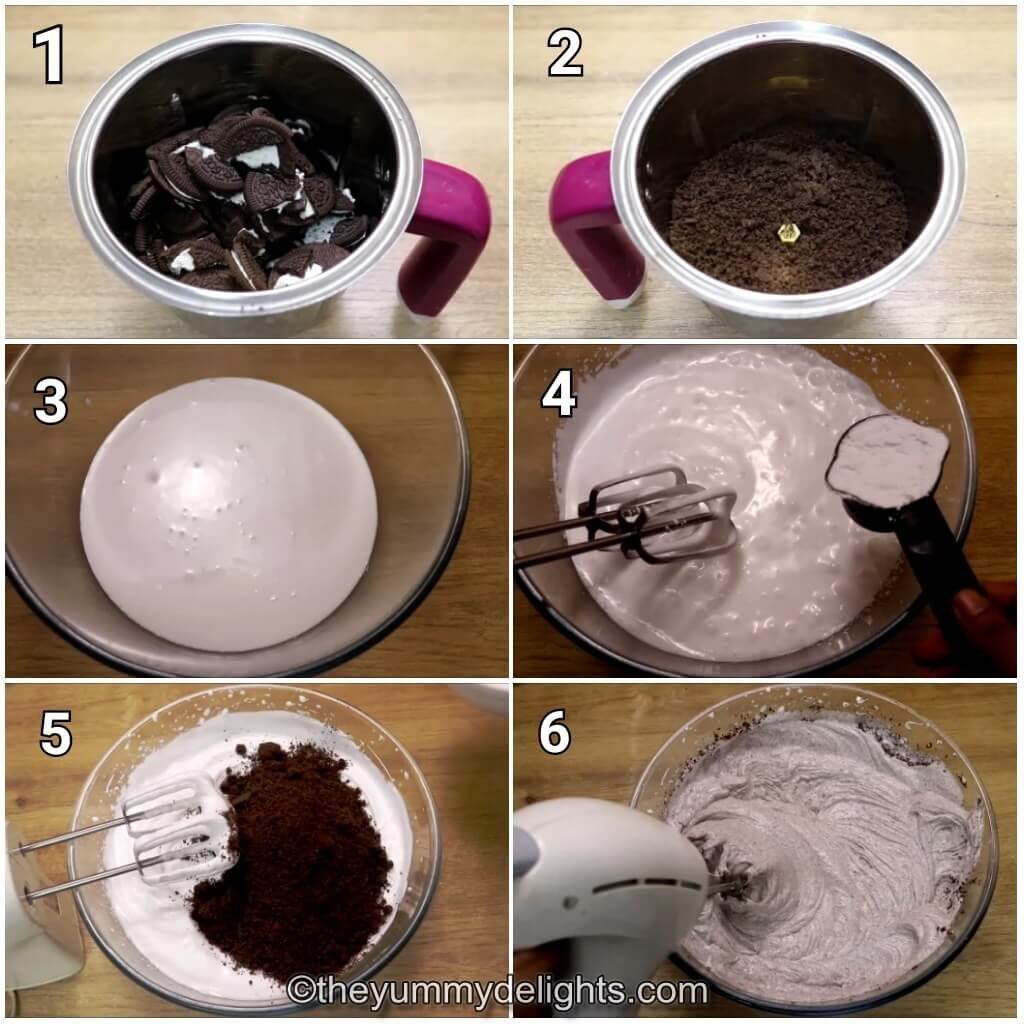
- Roughly chop or crush the Oreo cookies into halves or quarters. Pulse them in a food processor or blender until they reach a fine crumb. Set them aside. This will yield approximately 2 cups of Oreo cookie crumbs.
- In a mixing bowl, pour the whipping cream and whisk it until you see smooth peaks form.
- Add the powdered sugar and whisk it for 2-3 minutes.
- Finally, add the Oreo crumbs and whisk until it reaches stiff peaks. Oreo whipped cream frosting is ready.
Frosting the Chocolate Cake With Oreo
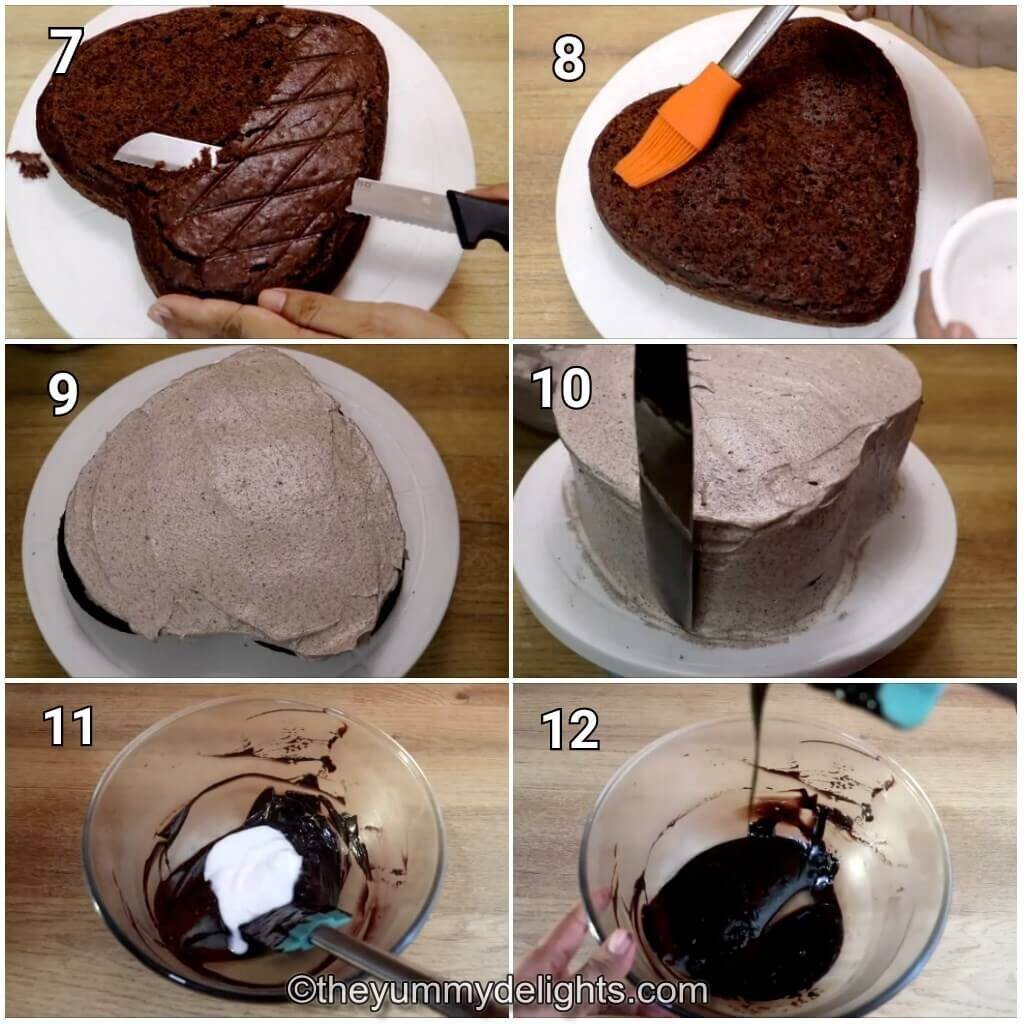
- Place the chocolate cake on the cake board. If the top of the cake is uneven, use a serrated knife to level it. Once leveled, slice it in half.
- Brush the first chocolate cake layer with a light coat of sugar syrup.
- Next, spread the prepared Oreo whipped cream frosting evenly over the soaked cake layer.
- Carefully place the second chocolate cake layer on the top.
- Again apply sugar syrup on top of the second layer.
- Frost the entire chocolate cake with the remaining Oreo whipped cream frosting, covering the top and sides. Use a spatula to smooth out the frosting for a clean finish.
- Refrigerate the cake for 30 minutes to allow the frosting to set.
For making Chocolate Ganache
- In a small bowl, finely chop the dark chocolate compound. This ensures the chocolate melts evenly and quickly. Melt the chocolate either with the double boiler method or in the microwave.
- Double Boiler Method: Place the chopped chocolate in a heat-resistant bowl set over a saucepan filled with simmering water (not boiling). Don't let the bottom of the bowl touch the water. Stir occasionally until the chocolate is melted and smooth.
- Microwave Method: Heat the chocolate in a microwave-safe bowl in short bursts (15-30 seconds) at medium power, stirring in between each burst, until melted and smooth. Be careful not to overheat, as chocolate can scorch easily.
- Once melted, pour the whipping cream to the melted chocolate. Gently stir or whisk the mixture until fully combined and smooth. The ideal consistency for ganache is pourable, but not too runny. It should be thick enough to coat the back of a spoon and leave a slight trail when dripped.
Quick Tip: Never add cold whipping cream to hot or melted chocolate. The whipping cream should be at room temperature otherwise it will set the melted chocolate.
Decorating the Chocolate Oreo Cake
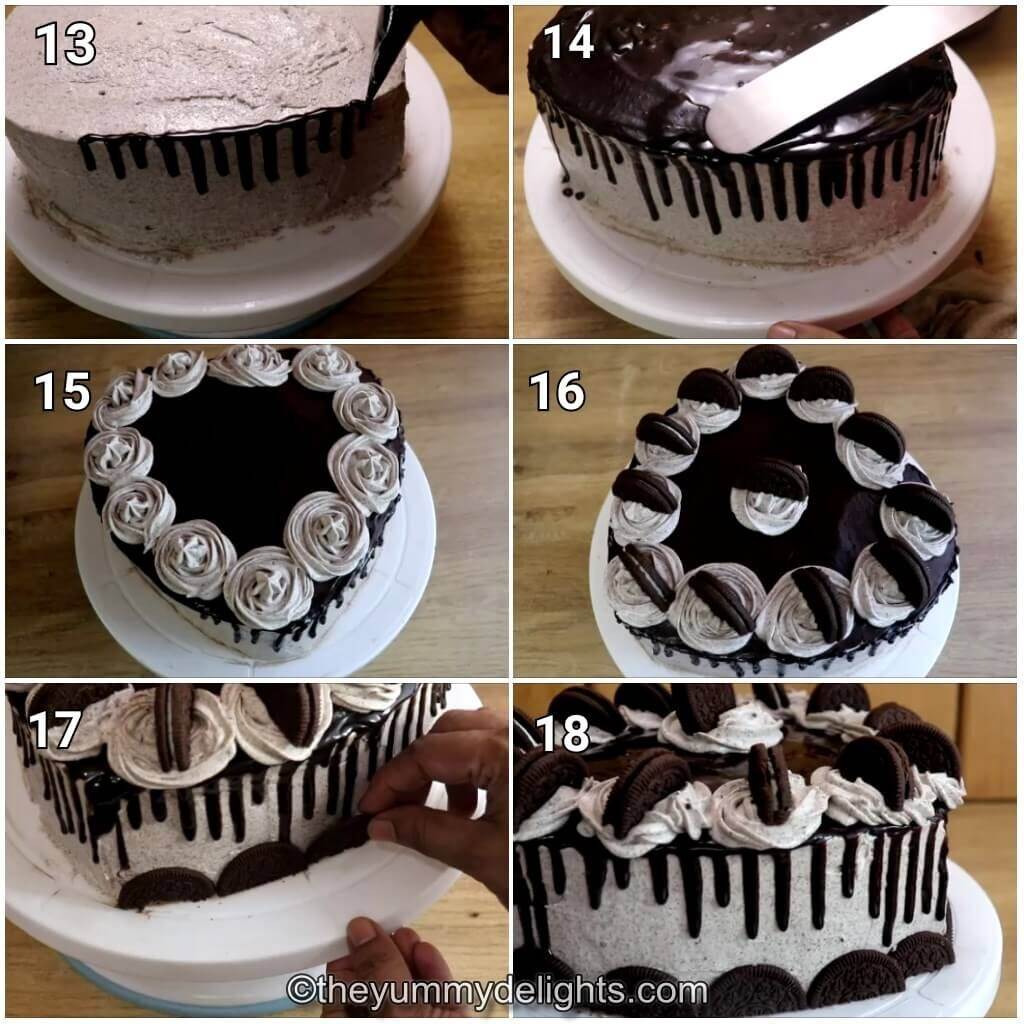
- Take out the chilled cake from the refrigerator. Ensure it's firm and cold.
- Start making the chocolate drips on the sides with the chocolate ganache. First, put slight pressure and see how far the drip goes. Now depending on this start making the drips. You can check out this Chocolate drip cake for how to make drips.
- Drizzle the remaining chocolate ganache on the top. Smooth it out. Use a cake spatula or offset spatula to achieve a clean finish.
- Refrigerate the cake for 30 minutes. The chocolate drips will set.
- Make some rosettes on the top.
- Decorate the base of the cake with cookies. Cut the cookies in half. Open the cookies. Remove the vanilla cream filling from it. (image 17 and 18)
Tips to make Best Chocolate Oreo cake
- Applying sugar syrup to the cake base helps to keep it moist.
- Refrigerate the cake for 30 minutes after applying the frosting.
- Before making chocolate drips on the cake make sure the cake is chilled. Otherwise, when you'll start making the drips, it will come all the way down to the base of the cake. I have shared in detail how to create perfect drips in the chocolate drip cake recipe.
- Refrigerate the cake again for 30 minutes after applying chocolate ganache. The ganache should be set before you start making rosettes on it.
- Leftover cake can be stored in the refrigerator. Cover and keep it in an airtight container in the refrigerator. Stays good for 2-3 days.
Other cake recipes you might like
- Chocolate drip cake
- Black forest cake
- Barbie Doll cake
- Chocolate Mug cake
- Gravity defying cake
- Honey cake
If you make this recipe, please leave a comment and a starred review below.
And, consider following me on social media so we can stay connected. I’m on Facebook, Pinterest, and YouTube!
Recipe Card
Chocolate Oreo Cake
Equipment
- Mixing bowl
- Whisk
Ingredients
Oreo Icing
- 2 packs of Oreo buiscuits. (120 gram each)
- 3 cups of whipping cream (sweetened) (chilled)
- ¼ cup powdered sugar or icing sugar
Chocolate ganache
- 100 grams of dark compound chocolate
- 50 grams of whipping cream (room temperature)
Decoration
- Oreo cookies - I have used 2 packets of Oreo cookies 120 gram and 50 grams
Other ingredients
- Sugar syrup - Mix 2 tablespoon of sugar in ¼ cup of water.
Instructions
How to make chocolate oreo cake
For making Oreo Whipped Cream Frosting
- Roughlychop or crush the Oreo cookies into halves or quarters. Pulse them in a foodprocessor or blender until they reach a fine crumb. Set them aside. This willyield approximately 2 cups of Oreo cookie crumbs.
- In a mixing bowl, pour the whipping cream and whisk it until you see smooth peaks form.
- Add powdered sugar and whisk it for 2-3 minutes.
- Finally, add the Oreo crumbs and whisk until it reaches stiff peaks. Oreo whipped cream frosting is ready.
Frosting the chocolate cake with oreo
- Place the chocolate cake on the cake board. If the top of the cake is uneven, use a serrated knife to level it. Once leveled, slice it in half.
- Brush the first chocolate cake layer with a light coat of sugar syrup.
- Next, spread the prepared Oreo whipped cream frosting evenly over the soaked cake layer.
- Carefully place the second chocolate cake layer on the top.
- Again apply sugar syrup on top of the second layer.
- Frost the entire chocolate cake with the remaining Oreo whipped cream frosting, covering the top and sides. Use a spatula to smooth out the frosting for a clean finish.
- Refrigerate the cake for 30 minutes to allow the frosting to set.
For making Chocolate ganache
- In a small bowl, finely chop the dark chocolate compound. This ensures the chocolate melts evenly and quickly. Melt the chocolate either with the double boiler method or in the microwave.
- Double Boiler Method: Place the chopped chocolate in a heat-resistant bowl set over a saucepan filled with simmering water (not boiling). Don't let the bottom of the bowl touch the water. Stir occasionally until the chocolate is melted and smooth.
- Microwave Method: Heat the chocolate in a microwave-safe bowl in short bursts (15-30 seconds) at medium power, stirring in between each burst, until melted and smooth. Be careful not to overheat, as chocolate can scorch easily.
- Once melted, pour the whipping cream (at room temperature) to the melted chocolate. Gently stir or whisk the mixture until fully combined and smooth. The ideal consistency for ganache is pourable, but not too runny. It should be thick enough to coat the back of a spoon and leave a slight trail when dripped.
Decorating the chocolate oreo cake
- Take out the chilled cake from the refrigerator. Ensure it's firm and cold.
- Start making the chocolate drips on the sides with the chocolate ganache. First, put slight pressure and see how far the drip goes. Now depending on this start making the drips.
- Drizzle the remaining chocolate ganache on the top. Smooth it out. Use a cake spatula or offset spatula to achieve a clean finish.
- Refrigerate the cake for 30 minutes. The chocolate drips will set.
- Make some rosettes on the top.
- Decorate the base of the cake with oreo cookies. Cut the cookies in half moon shape. Open the cookies. Remove the vanilla cream filling from the cookies. Stick it to the base of chocolate oreo cake.
Video
Notes
- Applying sugar syrup to the cake base helps to keep it moist.
- Refrigerate the cake for 30 minutes after applying the frosting.
- Before making chocolate drips on the cake make sure the cake is chilled. Otherwise, when you will start making the drips the chocolate drips will come all the way down to the base of the cake. I have shared in detail how to create perfect drips in the chocolate drip cake recipe.
- Refrigerate the cake again for 30 minutes after applying chocolate ganache. The ganache should be set before you start making rosettes on it.
- Leftover cake can be stored in the refrigerator. Cover and keep it in an airtight container in the refrigerator. Stays good for 2-3 days.
Nutrition
Nutrition information is automatically calculated, so should only be used as an approximation.




Arya
Looks delicious. Will definitely make it.
Preeti
Do share your feedback with us.