

Barbie doll cake recipe with step-by-step photos and a video recipe. This birthday cake is perfect for your little princess's special day. With layered sponge cake, whipped cream frosting, and a little piping, you can make a pretty Barbie doll birthday cake at home without using a special mold.
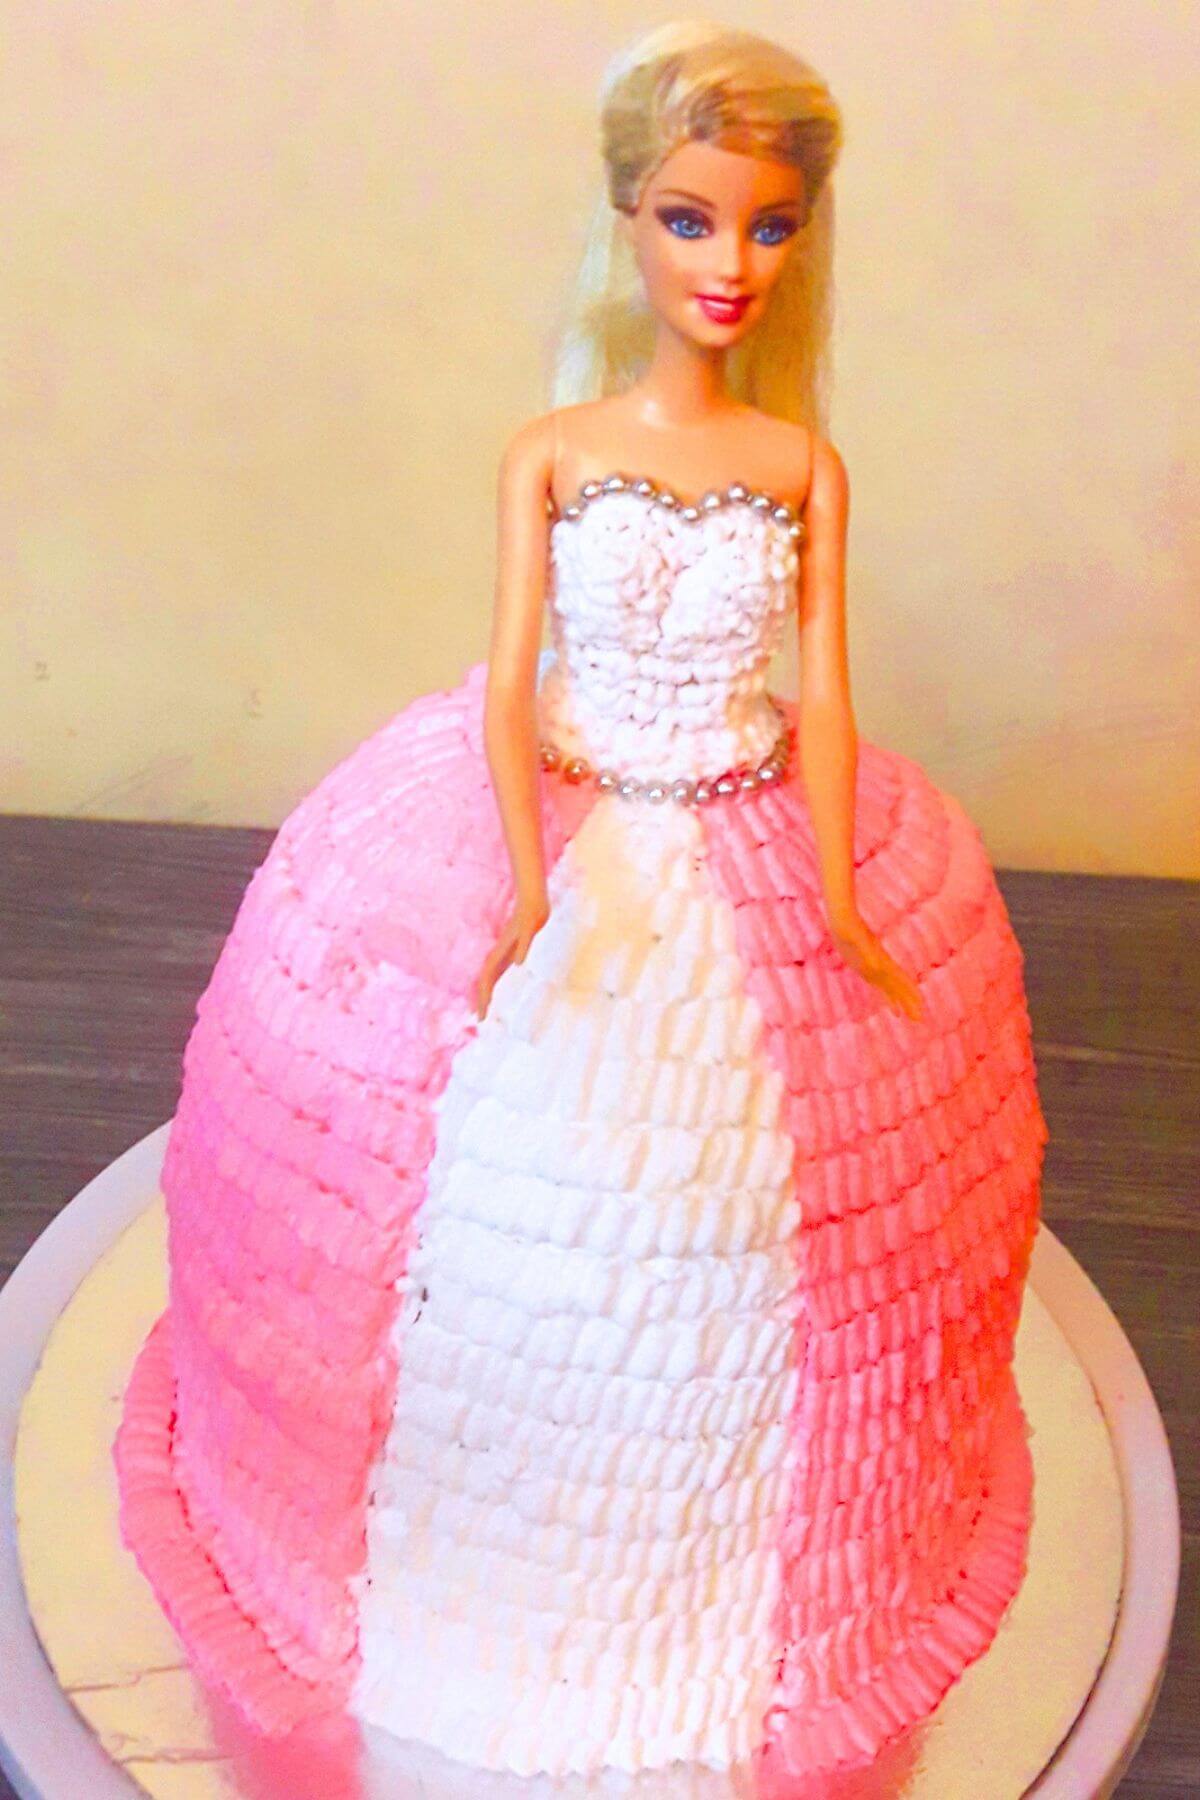
My daughter requested this Barbie doll cake for her birthday, and I was happy to make it for her. I am not a professional baker, but I am happy to share what I learned while making this doll cake at home. I have included step-by-step photos, a video, and tips to help you avoid common mistakes. If I can make it in my own kitchen, I believe you can too.
Quick Look: Barbie Doll Cake Recipe
- Prep Time: 2 hours
- Cook Time: 1 hour
- Yield: 1 doll cake
- Key Ingredients: Vanilla sponge cake, sweetened non-dairy whipping cream, sugar syrup, pink food colouring, and edible silver beads
- Method: Bake the sponge cakes → stack with whipped cream icing → carve into a dome shape → crumb coat and chill → decorate with piped ruffles
- Difficulty: Moderate, especially if you are new to cake decorating
About this Doll Cake Recipe
A Barbie doll cake is a cake shaped like a doll's dress, with a Barbie doll placed in the centre. The cake is covered with frosting and decorated to look like a beautiful dress, making it a lovely centrepiece for a kids' birthday party.
This Barbie doll cake is made without a special doll cake mould. I used four vanilla sponge cakes, whipped cream icing, and a serrated kitchen knife to shape the cake into a doll's dress.
The Barbie doll dress is decorated with pink and white whipped cream ruffles and edible beads. Follow the step-by-step photos and video to see how I assembled, shaped, and decorated the Barbie doll cake.
To save time, you can bake the sponge cakes a day in advance and decorate the cake the next day. It took me about 2 hours to assemble and decorate the cake. Love to make a homemade birthday cake? Try my Chocolate Oreo Cake next.
Jump to:
Ingredient Notes
- Sponge cake: I used an eggless vanilla sponge cake for this recipe, but you can also use a vanilla sponge cake made with eggs.
- Whipping cream: I used sweetened, non-dairy whipping cream, but you can also use dairy whipping cream or buttercream frosting if you prefer.
- Sugar syrup: Brushing the syrup over the sponge layers helps keep the cake moist.
- Pink food colouring: Used to colour some of the icing for the dress. You can use any color of your choice.
- Edible silver beads: Used to decorate the finished dress.
- Sturdy plastic straws: These support the stacked cake layers.
How to make a Barbie Doll Cake (with Step-by-Step Photos)
Prepare a basic Vanilla Sponge Cake
Step 1: I used my eggless vanilla sponge cake recipe to make this Barbie doll cake. I baked four sponge cakes to create the height needed for the doll's dress. The number of cakes you need may vary depending on the height of your doll and the size of your cake pans.
You can also use a doll cake mould if you prefer. These moulds are available online and can help you achieve the dress shape.
Making the Whipped Cream Icing
Step 2: Take the whipping cream in a mixing bowl. For best results, chill the cream overnight. Before using, keep it outside the refrigerator for about 30 minutes. It should still have some ice crystals, but should not be completely frozen. I find that partially frozen cream whips faster, so there is no need to chill the bowl and beaters separately.
Step 3: Whip the cream until stiff peaks form. This takes about 3-5 minutes, depending on the cream and mixer. I used sweetened whipping cream, so there is no need to add sugar.
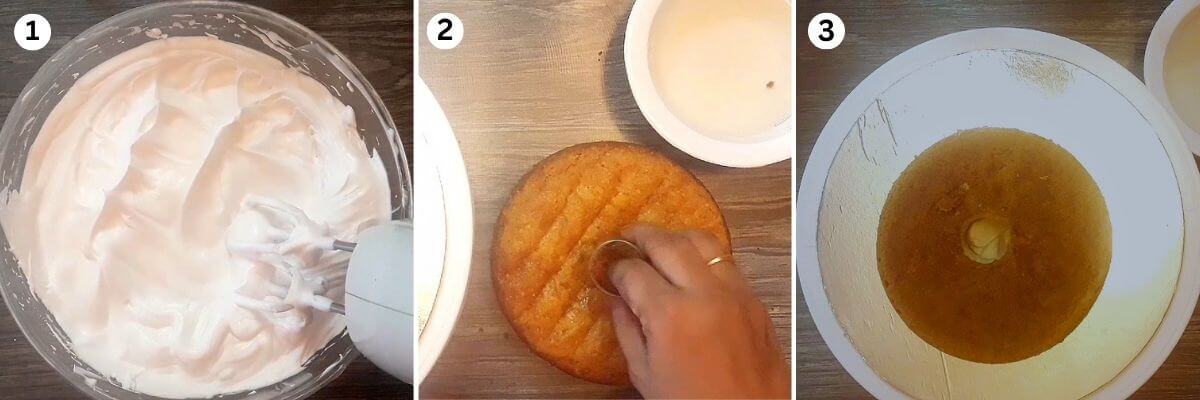
Step 4: Stop whipping once the cream holds stiff peaks (image 1). Avoid overbeating, as the cream can turn grainy and eventually separate into butter. Add vanilla essence, if using, and mix gently.
Assembling the Barbie Doll Cake
Step 5: Using a cookie cutter, cut a small hole in the centre of each sponge cake so the Barbie doll can be inserted later (image 2).
Step 6: Spread a little whipped cream icing on the cake board and place the first sponge cake on it (image 3). It will help to firmly hold the bottom of the cake on the cake board.
Step 7: Brush or pour sugar syrup over the cake (image 4), then spread a layer of whipped cream icing (image 5).
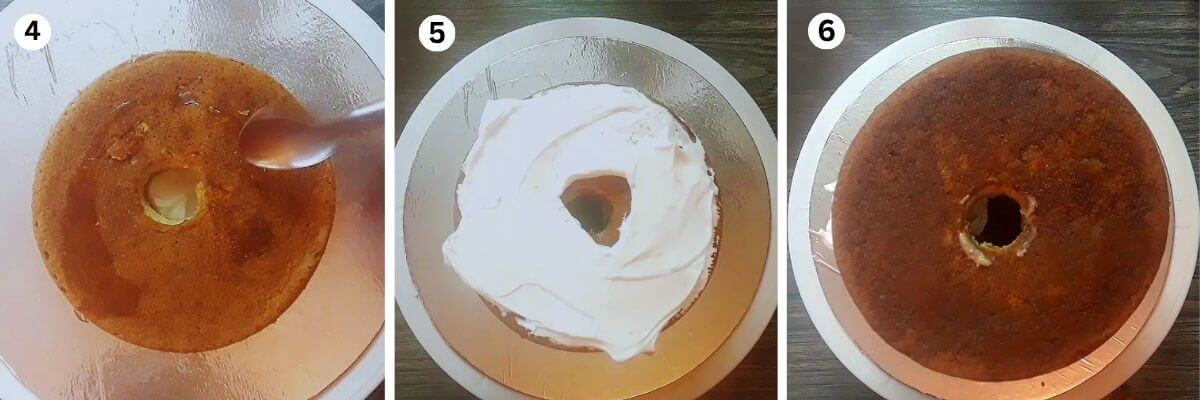
Step 8: Place the second sponge cake on top. Add sugar syrup and icing (image 6), then repeat with the third sponge cake. Place the fourth sponge cake on top and moisten it with sugar syrup.
Shaping the Barbie Doll Cake Dress
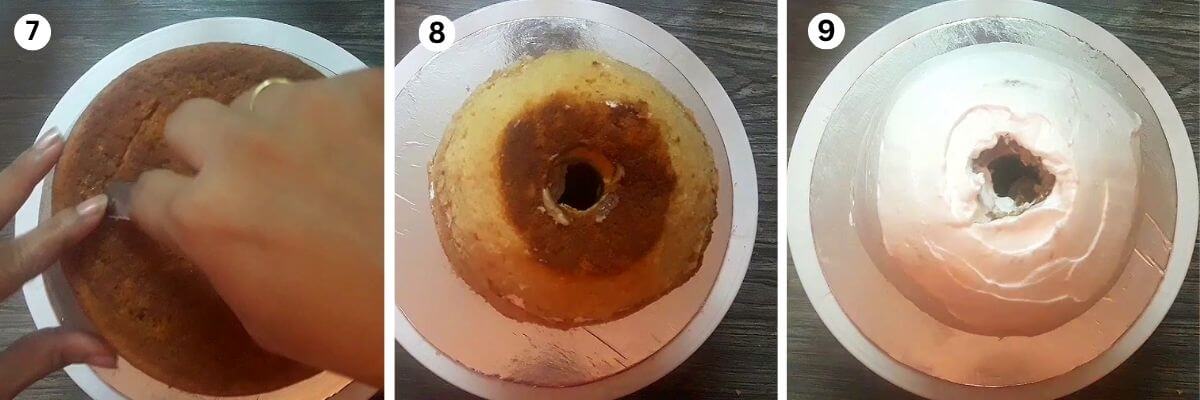
Step 9: Using a serrated knife, start by shaping the top sponge cake. Hold the knife at a 45-degree angle and leave about 1 inch from the outer edge of the cake (image 7). Start cutting a circle, removing small portions of the sponge cake at a time.
Step 10: Once the top sponge cake is shaped, continue trimming the stacked cakes to form a dome, like a skirt. Carefully carve the cake from the top down, keeping the shape even on all sides (image 8).
Step 11: Brush away loose crumbs. Measure the height of the cake and cut 3 sturdy, hard plastic straws to the required length. Insert them vertically into the cake to help hold the layers in place.
Step 12: Apply a thin layer of whipped cream icing over the entire cake to make a crumb coat (image 9). This helps seal the crumbs before decorating. Refrigerate for about 30 minutes to an hour to let the crumb coat set.
Decorating the Barbie Doll Cake Dress
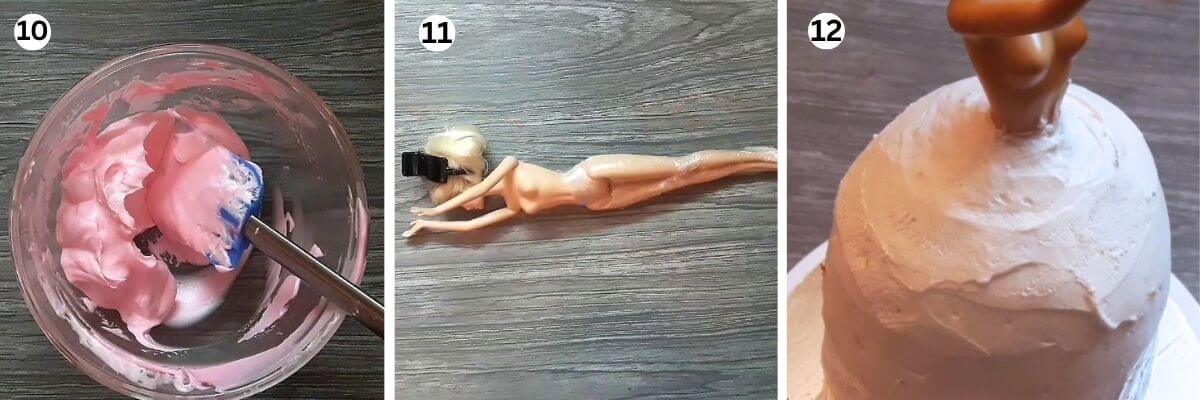
Step 13: For the skirt part, I used white and pink whipped cream to decorate the skirt. Divide a small portion of whipped cream into a bowl and add pink food colouring. Mix well (image 10). Transfer it to a piping bag. Keep the pink icing refrigerated until needed. Leave the remaining icing white. Keep this white icing refrigerated.
Step 14: Tie the Barbie doll's hair up and wrap the lower part of the doll in cling wrap to protect it from the icing (image 11). Insert the doll into the hole in the centre of the cake, adjusting it so the waist meets the top of the skirt. Pipe a little icing around the waist to secure it (image 12).
Step 15: Use a skewer to lightly mark the design of the dress on the cake (image 13). Fill the marked areas with white whipped cream icing, piping in an up-and-down motion to create ruffles (image 14). If you are a beginner, practise piping the ruffles on butter paper or a plate first.
I used an INOX No. 14 piping tip to make the ruffles on the doll's dress.
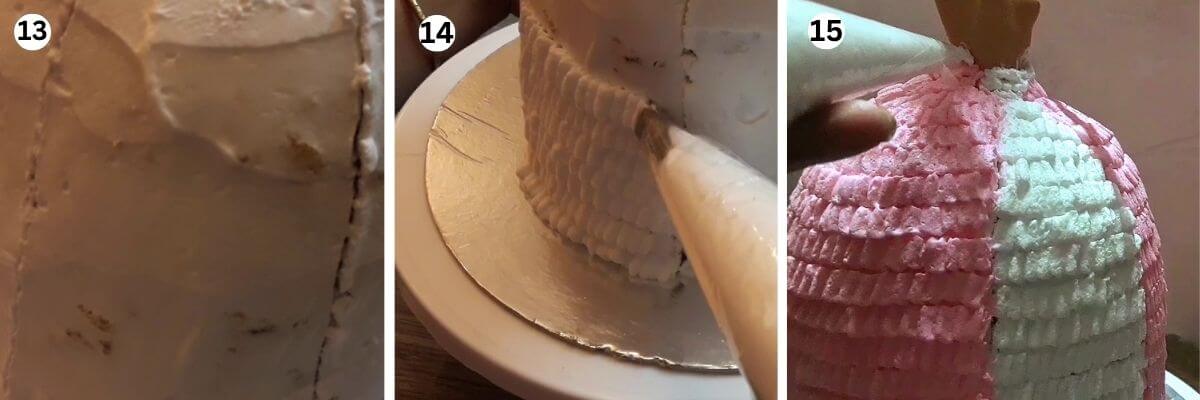
Step 16: Pipe pink ruffles over the remaining sections of the skirt (image 15). You can use any colours you like to match your preferred dress design.
Step 17: Decorate the bodice with small dots of whipped cream and finish the dress with edible silver pearls (images 16 & 17).
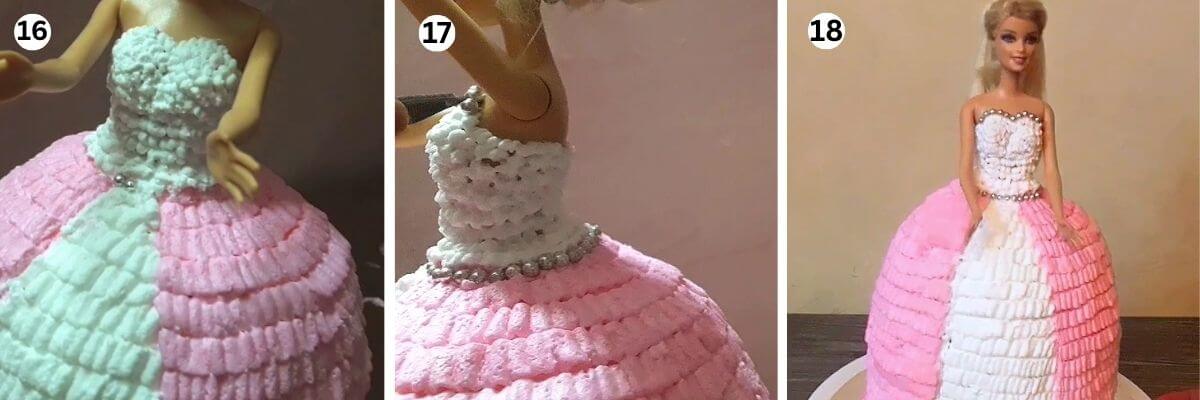
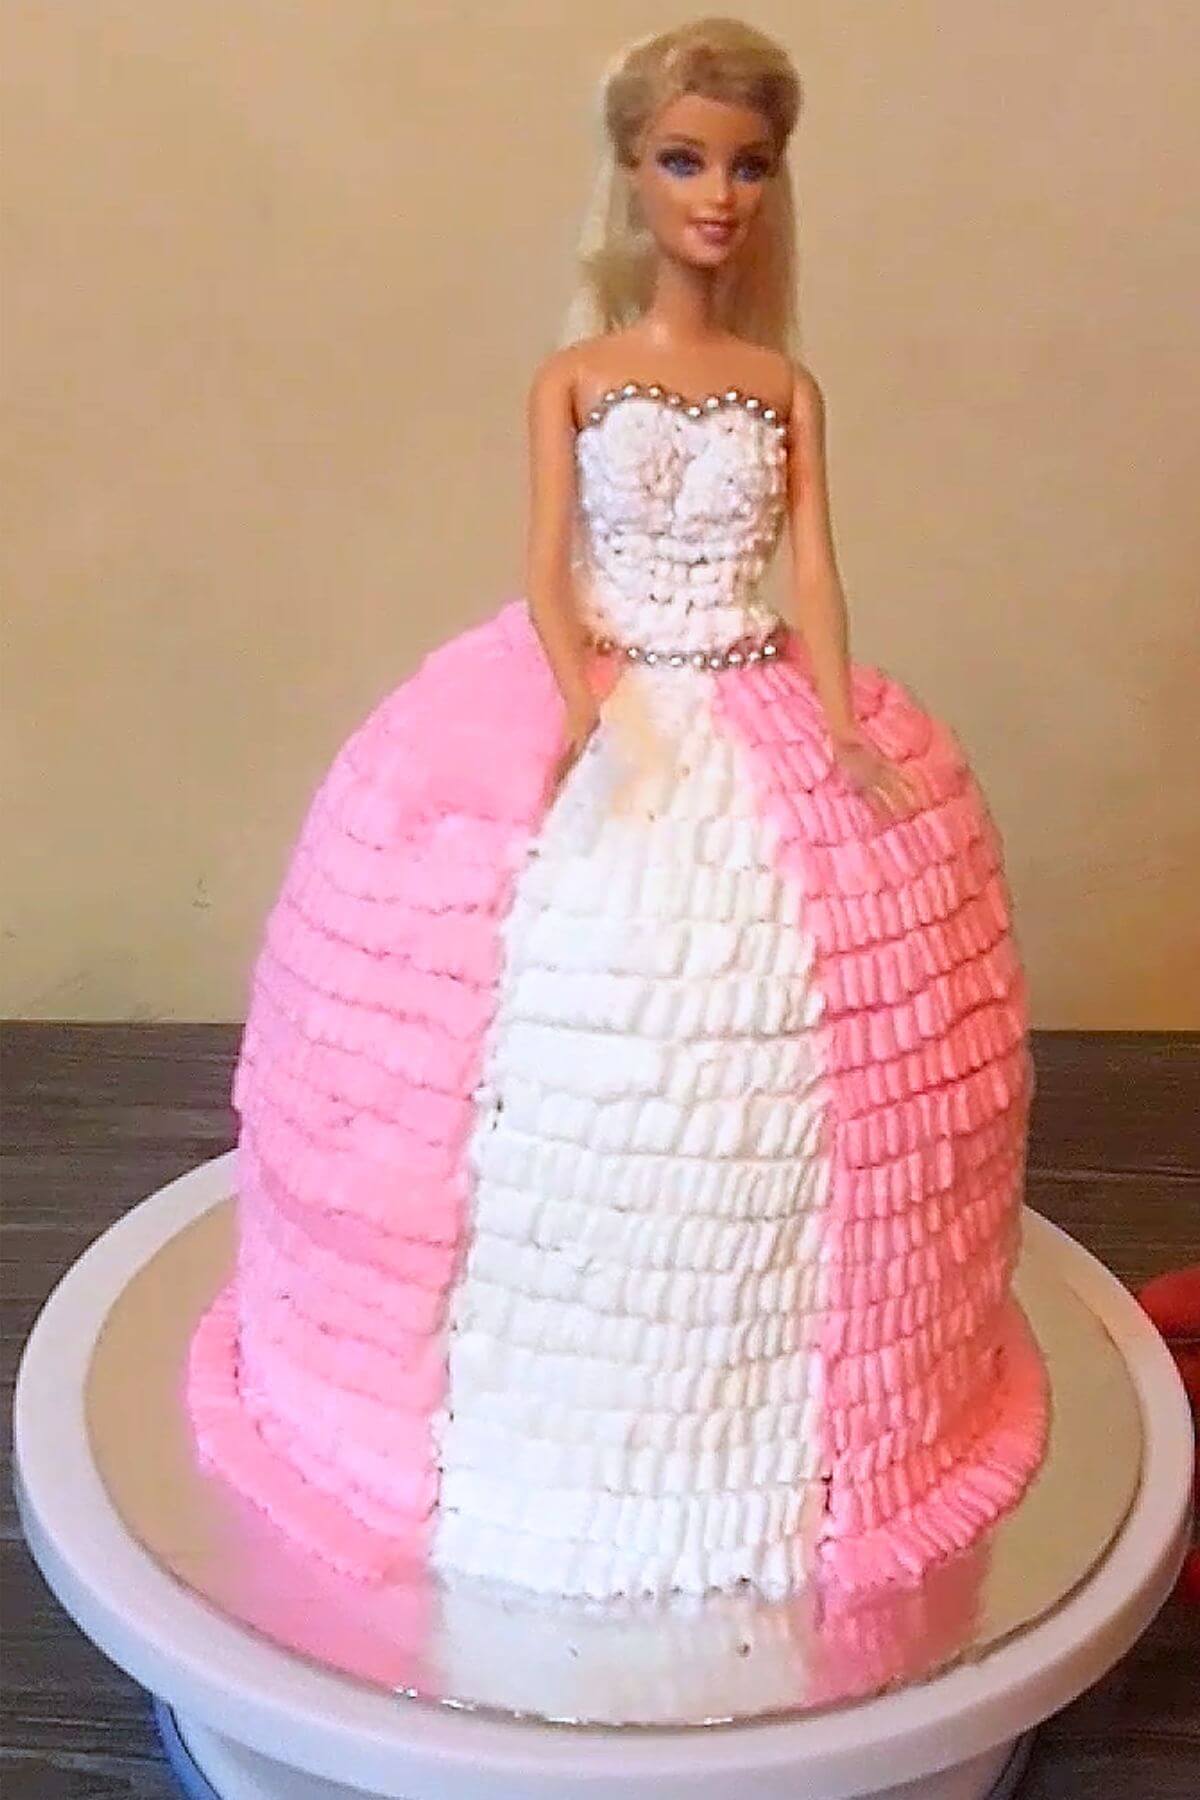
Your Barbie doll cake is ready (image 18). I placed a small cupcake on the cake board to hold the birthday candle.
Tips to make the Best Barbie Doll Cake
- Bake the sponge cakes ahead: Chilled cakes are easier to carve and assemble.
- Choose the cake height carefully: Check the Barbie doll's height before deciding how many layers to bake.
- Use support straws: Cut the food-safe straws to the cake's height and insert them vertically.
- Chill before decorating: Allow the crumb coat to set before piping the dress.


Recipe Card

Barbie Doll Cake Recipe | How to make a Doll Cake
Video

Ingredients
For the Sponge Cake
- 1 cup all-purpose flour (maida)
- ¾ cup curd plus 1 tablespoon, if required, at room temperature
- ¾ cup sugar
- ½ teaspoon baking powder
- ½ teaspoon baking soda
- ¼ cup cooking oil
- 1 teaspoon vanilla essence
For the Sugar Syrup
- 1 tablespoon sugar
- ¼ cup water
For the Icing
- 700 ml sweetened non-dairy whipping cream chilled
- 1 teaspoon vanilla essence
For Decoration
- Edible silver beads
- Pink food colouring
- INOX No. 14 piping tip for making ruffles
- 3 plastic straws
Instructions
Prepare a basic vanilla sponge cake
- In my last post, I have shared the recipe for eggless vanilla sponge cake. The ingredients listed below make one sponge cake. You will need to bake four sponge cakes for this Barbie doll cake recipe. Depending on the height of the doll, decide on how much sponge cake you require to prepare for making the dress of the doll.
Making the whipped cream icing
- Take chilled non-dairy whipping cream in a mixing bowl and whip until it starts to thicken.
- Add vanilla essence and continue whipping until stiff peaks form. The cream is ready to use.
Assembling the Doll cake
- Cut a small circle in the centre of each sponge cake using a cookie cutter. This creates space for the doll to fit into the cake.
- Spread a little icing on the cake board and place the first sponge cake on it.
- Brush the sponge cake with sugar syrup and spread a layer of icing over it.
- Place the second sponge cake on top. Repeat the process with the second and third layers.
- Place the fourth sponge cake on top and brush it with sugar syrup.
Shaping the Doll cake dress
- Hold the knife at a 45-degree angle. Leave about 1 inch from the outer edge and start carving a circle into the top of the sponge cake.
- Using a serrated knife, gradually carve the stacked cakes into a dome shape to create the Barbie doll's dress.
- Using a brush remove the crumbs sticking to the cake and the cake board.
- Measure the height of the cake and cut three food-safe plastic straws to the required length. Insert them vertically into the cake to support the layers.
- Crumb coat the cake. Apply a thin layer of icing all over the cake using a palette knife. This crumb coat helps seal in the crumbs.
- Refrigerate the cake for 30 minutes to 1 hour, or until the icing sets.
Decorating the dress of Doll cake
- For the skirt part, I am using white and pink colors.
- To make pink icing, take 4-5 tablespoons of whipped cream in a bowl. Add a few drops of pink food colouring and mix well. Transfer the pink icing to a piping bag and refrigerate until needed.
- Tie the barbie doll's hair up and wrap the lower part of the Barbie doll in cling wrap to protect it from the icing.
- Insert the doll into the centre of the cake from the top. Apply a little icing around her waist to secure the doll.
- Mark the design of the dress on the cake to guide you while piping the ruffles.
- Fill the marked sections with white icing, piping ruffles to create the skirt design.
- Pipe pink ruffles over the remaining sections of the skirt.
- Pipe small white dots on the bodice of the dress. Decorate the dress with edible silver pearls.
- The Barbie doll cake is ready. I placed a small cupcake on the cake board to hold the candle.
Notes
- Bake the sponge cake a day ahead: It took me about an hour to bake the sponge cakes for this doll cake. You can bake them a day in advance and refrigerate them. Chilled cake is firmer and easier to carve into the shape of a doll's dress.
- Use plastic straws to support the cake: I initially used skewers to hold the sponge cake layers in place, but plastic straws are a better option. They help support the layers and keep the cake stable. Use food-safe straws cut to the correct length.
- Choose the cake height carefully: Check the doll's height before deciding how many layers to bake.
- Chill before decorating: Allow the crumb coat to set before piping the dress.
Nutrition
Nutrition information is automatically calculated, so should only be used as an approximation.


cake
really i appreciate, you made and guide properly regarding cake recipe now i want to try this recipe pictures also looking very awesome
Taravilasini
Very nice cute barbie doll recipe 4 the beginners. Thank you
Rajeev Naik
good
Tara
Lovely Barbie doll recipe, very easy to prepare especially 4 the beginners … thank you for sharing
Preeti
Welcome.
Shiva
Wonderful recipes on the website. Post some quick breakfast recipes.
Soumya
Nice work. The procedure is beautifully explained. Please post more recipes.
Awilda Ritums
Hi, This is a nice website, thank you for the detailed article. Have a nice day.
Preeti Nayak
Thanks
Dana Warde
Hiya, Thank you for the beautiful dessert recipe, It is nice to find gems like this one on your blog. I love making scones and hot chutneys for my husband in in the cold winter months and ice cream in the summer months.
Preeti Nayak
Thanks
Rona Defrank
Hello, This is a great quick recipe, thank you for sharing it with us. I am a foodie lover and I enjoy baking bread and butter pudding.
Preeti Nayak
Thanks