Black Forest Cake recipe without oven with step by step photos and video recipe. When it comes to any birthday celebration most of us love to have a black forest cake. I made this eggless black forest cake for my hubby's birthday. I have made black forest cake many times but this one is different. This black forest cake is made without an oven.
What is so special about this recipe?
I love to bake the eggless cake and this one was truly fantastic. I made a chocolate lace wrap for this cake (first time) and the finished cake looks so beautiful. This is a basic chocolate lace design for beginners. Also, this black forest cake is made without Oven and is eggless too 🙂
In this post, I am sharing an eggless black forest cake recipe that is made without an oven with a beautiful chocolate lace wrap. I baked an eggless chocolate sponge cake, the previous day, cling wrapped it and kept in the fridge. The next day did the assembling and icing of black forest cake.
You can also check other delicious and popular Cake recipes here:
Black Forest Cake without oven recipe
Recipe Card
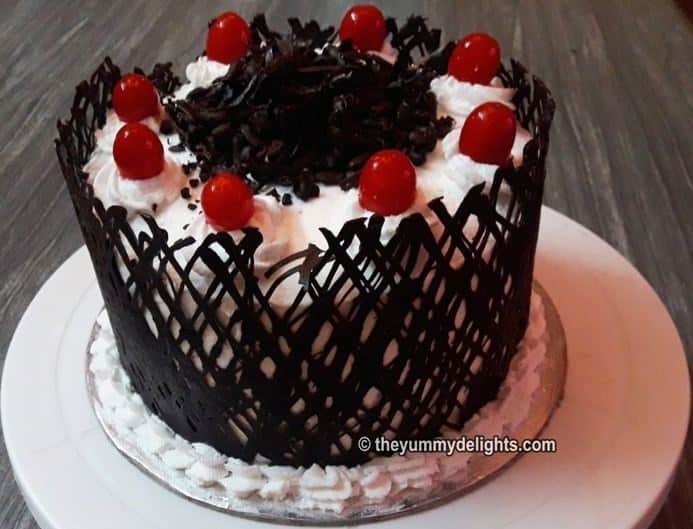
Black Forest Cake (No Oven, No Eggs) | How to make Black Forest Cake without Oven
Video

Ingredients
For making chocolate sponge cake:
- 1 ½ cup All purpose flour/Maida
- ¼ cup cocoa powder
- ¼ cup sugar
- 1 teaspoon baking powder
- ½ teaspoon baking soda
- ½ cup hot water
- ½ teaspoon Instant coffee powder
- 1 teaspoon vanilla essence
- 80 gram salted butter
- ½ tin condensed milk
For making Cherry Syrup:
- 10-15 roughly chopped cherries
- ½ cup water
- 2 tablespoon sugar
For Whipped Cream Icing:
- 500 ml non-dairy whipping cream
- ¼ cup icing sugar
For Chocolate collar/Chocolate lace:
- ½ cup roughly chopped dark chocolate compound
- butter paper
Other ingredients:
- 8 whole cherries decorating the cake
- A small block of chocolate for making chocolate shavings
For the Oven set up:
- A kadhai/Indian Wok
- 1 cup of salt
- hot-pot stand
Instructions
First, we will make an oven set up to bake the cake.
- Put salt in the base of the Kadhai/Indian Wok. Spread it evenly. Now put a stand on it. Cover with a lid. Heat it on the lowest flame. This process is same as preheating the Oven.
Prepare a chocolate sponge cake for making a black forest cake.
- Take hot water in a bowl. Add instant coffee powder and vanilla essence in it. Mix it well and keep it aside.
- In a large mixing bowl, add butter, condensed milk, sugar, coffee and vanilla mixture. Whisk it well.
- Sift all purpose flour/maida, cocoa powder, baking powder & baking soda. Add this to the wet ingredients. Mix it using cut & fold method.
- Pour the batter in a cake tin. Tap it twice to remove any air bubbles in it.
- Open the lid of the Pan. Place the cake tin over the stand. Cover it with the lid.
- Bake it on the lowest flame for 45 minutes. Check with a toothpick. If you insert a toothpick in the middle of the cake and it comes out clean, the cake is ready. Switch off the flame.
- Carefully take out the cake tin. Let it cool down for 5 minutes in the cake tin.
- Loosen the sides of the cake with a knife. Place a plate over the cake tin and flip it. Remove the butter paper. Chocolate sponge cake is ready for making the black forest cake. Let the cake cool down completely. Cling wrap it and refrigerate.
Prepare a cherry syrup for making the back forest cake.
- Heat water in a pan. Add chopped and deseeded cherries and sugar in it. Mix it well.
- Bring it to a boil. Now simmer it for 5 minutes. Switch off the flame.
- Let it cool down completely. Cherry syrup is ready.
Prepare the whipped cream icing.
- Whip heavy cream and icing sugar in a mixing bowl until it reaches stiff peaks.
- Cover it with a cling wrap and keep it in the fridge. The icing is ready for making a black forest cake.
Assembling the black forest cake:
- Using a serrated knife remove the dome shape of the cake. You can use the removed pieces later for making the cake pops.
- Cut the cake in layers. Keep it aside.
- Take a cake board. Place some icing on it.
- Put a layer of sponge cake over it.
- Pour some cherry syrup over it.
- Apply whipped cream icing and spread it evenly. No need to spread it evenly.
- Put some cherries over it.
- Now cover it with a second layer of sponge cake. Gently press it. Repeat the same process (5, 6 & 7) until the last layer is placed.
- Finally, put the last layer of the sponge cake. Pour some cherry syrup over it. Apply a generous amount of icing on the top. Smoothen it.
- Apply whipped cream icing on the sides and smoothen it.
- Keep it in the fridge for 30 minutes or in the freezer for 15 minutes to set.
- Make rosettes on the top of black forest cake.
Prepare a chocolate lace wrap for black forest cake:
- Take a butter paper
- length = circumference of the cake tin + 1-inch
- height = height of the prepared iced cake + 1 inch or half inch
- Melt roughly chopped chocolate compound on a double boiler. Whisk it to remove any lumps. Fill it in an icing bag.
- Draw a pattern on the butter paper with melted chocolate. Let it sit for 5 minutes.
- Hold it and wrap the chocolate side on the iced cake side.
- Keep it in the freezer for 10 minutes. Touch it and if the chocolate is hard then remove the butter paper and a beautiful chocolate lace for the black forest cake is ready.
- Make shell design at the bottom of the cake.
- Put cherries on the top of black forest cake.
- With the help of a peeler prepare some chocolate shavings. Sprinkle it on the top of the cake.
- Black forest cake is ready.
Notes
2. Do not over mix the batter. It will make the sponge cake hard.
3. Try to check after 30 minutes of baking whether the cake is ready. Test with a toothpick. If the cake is over baked it will turn hard. The timings of baking may differ.
4. Keep the whipping cream pack in the freezer and chill overnight. Once chilled thaw it till it is 50% ice. Now take it out and whip. It will whip faster. No need to chill the bowl, beater blades etc.
5. Grease a cake tin with oil and dust it with flour. Line a butter paper/parchment paper on the base of cake tin. Also, grease the butter paper with oil and dust it with flour too.
Nutrition
Nutrition information is automatically calculated, so should only be used as an approximation.
How to make black forest cake recipe without oven with step by step photos:
First of all, we will make an oven set up ready.
- Put salt in the base of the Kadhai/Indian Wok. Spread it evenly. Put a stand on it. Cover with a lid. Heat it on the lowest flame. This process is the same as preheating the Oven.
Now prepare a chocolate sponge cake for making the black forest cake.
- Take hot water in a bowl. Add instant coffee powder and vanilla essence in it. Mix it well and keep it aside.
- In a large mixing bowl, add butter, condensed milk, sugar, coffee and vanilla mixture. Whisk it well.
- Sift all purpose flour/maida, cocoa powder, baking powder & baking soda. Add this to the wet ingredients. Mix it using cut & fold method.
- Pour the batter in a cake tin. Tap it twice to remove any air bubbles in it. I have already greased the cake tin with oil and dust it with flour. Line a butter paper/parchment paper on the base of cake tin. Grease the butter paper with oil and dust it with flour too.
- Now open the lid of the Pan. Place the cake tin over the stand. Cover it with the lid. Bake it on the lowest flame for 45 minutes. Check with a toothpick. If you insert a toothpick in the middle of the cake and it comes out clean, the chocolate sponge cake is ready. Switch off the flame.
- Carefully take out the cake tin. Let it cool down for 5 minutes in the cake tin. Loosen the sides of the cake with a knife. Place a plate over the cake tin and flip it. Remove the butter paper. Chocolate sponge cake is ready for making the black forest cake. Let the cake cool down completely. Cling wrap it and refrigerate.
Next, prepare a cherry syrup for making the back forest cake.
- Heat water in a pan. Add chopped and deseeded cherries and sugar in it. Mix it well.
- Bring it to a boil. Now simmer it for 5 minutes. Switch off the flame.
- Let it cool down completely. Cherry syrup is ready.
Now, prepare the whipped cream icing.
- Whip heavy cream and icing sugar in a mixing bowl until it reaches stiff peaks.
- Cover it with a cling wrap and keep it in the fridge. The icing is ready for making a black forest cake.
Assembling the black forest cake:
- Using a serrated knife remove the dome shape of the cake. You can use the removed pieces for making the cake pops 🙂
- Cut the cake in layers. Keep it aside.
3. Take a cake board. Place some icing on it. Put a layer of sponge cake over it.
4. Pour some cherry syrup over it.
5. Apply whipped cream icing and spread it evenly. No need to smoothen it.
6. Put some cherries over it.
7. Now cover it with a second layer of sponge cake. Gently press it. Repeat the same process (5, 6 & 7) until the last layer is placed.
8. Finally, put the last layer of the sponge cake. Pour some cherry syrup over it. Apply a generous amount of icing on the top. Smoothen it.
9. Apply the whipped cream icing on the sides and smoothen it.
10. Keep it in the fridge for 30 minutes or in the freezer for 15 minutes to set.
11. Make rosettes on the top of a black forest cake.
To make the chocolate lace wrap for black forest cake:
- Take a butter paper
- length = circumference of the cake tin + 1-inch
- height = height of the prepared iced cake + 1 inch or half inch
- Melt roughly chopped chocolate compound on a double boiler. Whisk it to remove any lumps. Fill it in an icing bag.
- Draw a pattern on the butter paper with melted chocolate. Let it sit for 5 minutes. When you hold the paper for wrapping it around the cake, the chocolate should not be runny. Also, do not let the chocolate to be hard. If it is hard you will not be able to wrap it around the cake.
- Hold it and wrap the chocolate side on the iced cake side. Do not press it or apply too much pressure on it. Just wrap it slowly.
- Keep it in the freezer for 10 minutes. After 10 minutes touch it and see, if the chocolate is set. If the chocolate is hard means it is set now. Remove the butter paper slowly and a beautiful chocolate lace wrap for the black forest cake is ready.
Make shell design at the bottom of the black forest cake.
Put cherries on the top of black forest cake.
With the help of a peeler prepare some chocolate shavings. Sprinkle chocolate shavings on the top of the cake.
Black forest cake without an oven is ready.
Cooking Tips
- You can alternatively bake a chocolate sponge cake in an Oven. Ingredients and their measurements for making black forest cake will be the same. Bake in a preheated oven 180-degree c for 35 minutes. Check for the doneness of cake after 30 minutes. Timings of baking may vary.
- While making whipped cream icing you can add a few drops of vanilla essence in it.
- Mixing the batter with cut and fold method is important. If the batter is over mixed the cake will be hard. Also, do take care there should not be any lumps in the batter. Mix the dry ingredients in batches slowly.
- While assembling the sponge cake if you find many cake crumbs are falling off then first do a crumb coat. Apply a thin amount of icing all over the cake and then put the cake in the fridge to set for 30 minutes. After 30 minutes take it out and again apply a generous amount of icing to cover the cake.
- Use measuring cups & spoon to measure the ingredients.

Rebecca Waugh
I’m concerned about the chocolate lace slipping off the whipped cream icing. Or do you just keep it in the fridge until serve?
Preeti Nayak
Yes, keep it in the fridge until you are ready to serve.
Swati choudhary
Very well explained. Your cake looks so beautiful. At first, I wasn't confident about the chocolate lace wrap but when I tried my hands on it...it came out very well. Thanks for the recipe. Love it.
Preeti Nayak
You are welcome. Happy to know you tried the recipe and liked it.
Ashwini Nagappa
Wow!!! I made it yesterday. Love the taste it was better than store bought. Chocolate lace I tried the first time and the cake looks so beautiful. Thanks a lot for sharing the recipe.
Preeti Nayak
Thanks. Happy to know you tried it and liked it.