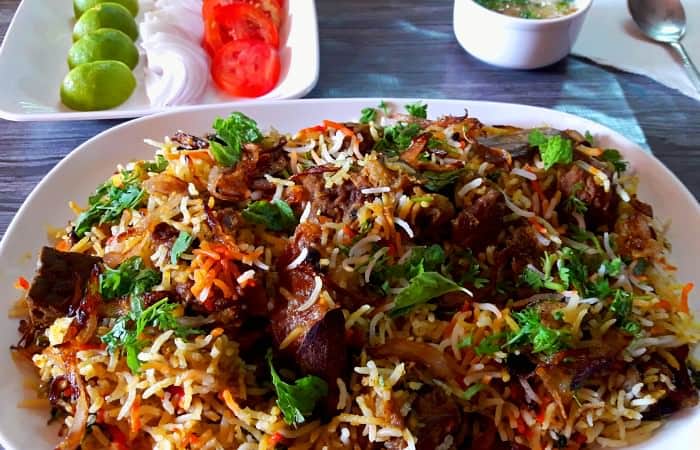
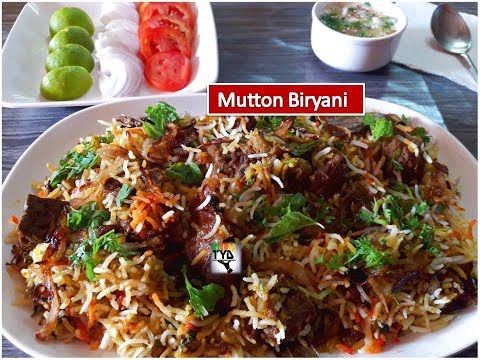
Hyderabadi mutton biryani is a flavorful rice dish from Hyderabad, India, made with mutton, rice, yogurt, herbs, and aromatic spices. Here's the step-by-step recipe on how to make this Mutton dum biryani easily at home.
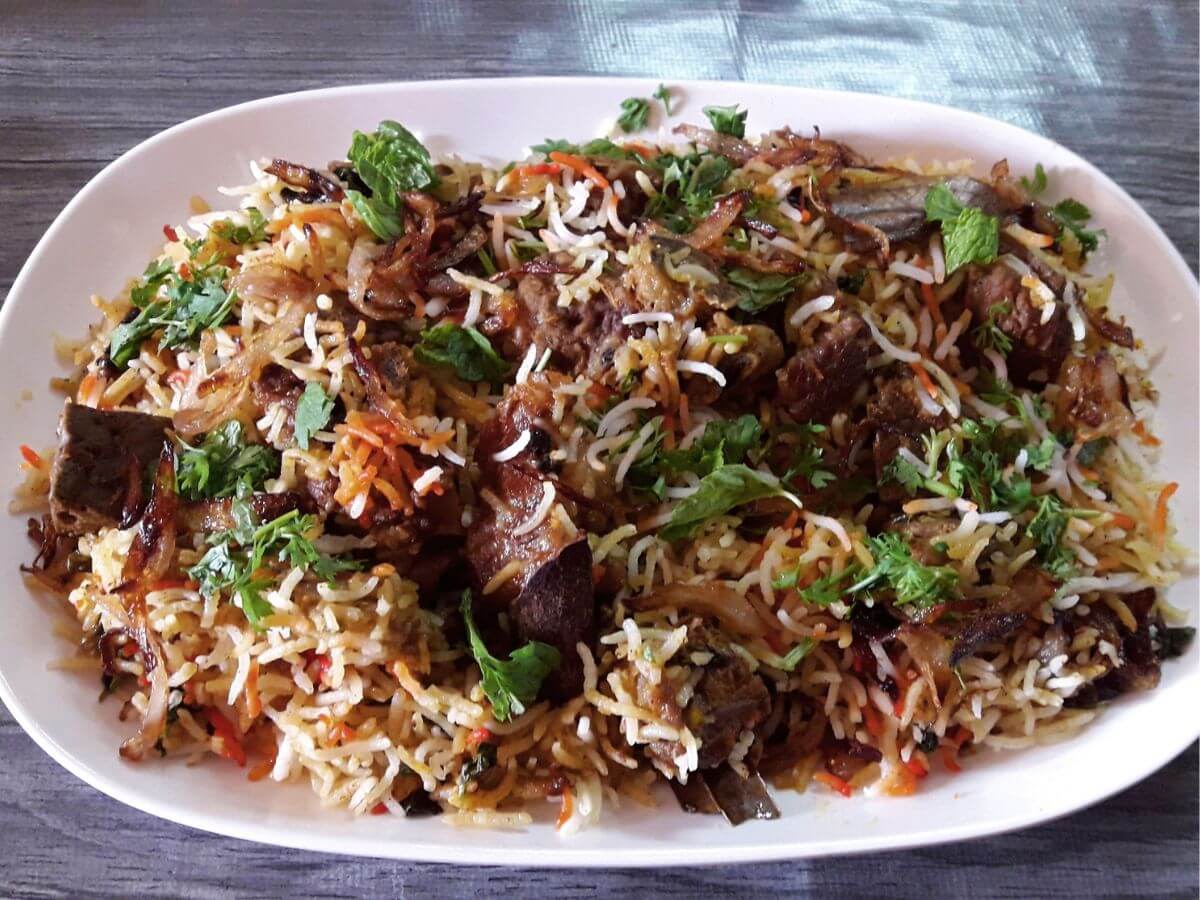
Hyderabadi cuisine is popular for its delicious rice and meat dishes. Hyderabadi biryani is so famous that it is considered synonymous with the city of Hyderabad. There is heavy use of aromatic spices and herbs that makes Hyderabadi biryani one of the most popular biryani in the World.
I love to make dishes from Hyderabadi cuisine. Some of the popular Hyderabadi dishes on this website are Hyderabadi Chicken Dum Biryani, Hyderabadi Chicken Masala, and Hyderabadi Green Chicken.
About this recipe
In this recipe post, I am sharing how to make an Authentic Hyderabadi Mutton Biryani recipe. This biryani is made using the Dum cooking process. I have explained the entire process in an easy way.
Mutton Biryani is a fragrant and aromatic rice dish that can be prepared in 4 simple steps.
- Cook Mutton
- Cook Rice
- Layer the mutton and rice in a pot.
- Dum cook the biryani - Dum cooking simply means cooking the mutton & rice on low heat in a sealed pot. The biryani gets cooked with the help of the steam formed inside. All the flavors of chicken, spices, and herbs get infused together with rice making it the best Hyderabadi Mutton Biryani.
Easy! right? All you need is to gather the ingredients and follow these simple steps.
You may also like these other popular biryani recipes from this website
- Hyderabadi Chicken Dum Biryani
- Lucknowi (Awadhi) Biryani
- Prawns Biryani
- Kolkata Chicken Biryani
- Egg Biryani in Pressure Cooker
Why You Need This Recipe
- Easy step-by-step process - with photos & a video of making biryani is included in the post for beginners.
- Tips to make perfect biryani - Making mutton biryani requires a lot of ingredients, time & experience. In this recipe post, I tried to include all the cooking tips to make the best mutton biryani that I learned all these years.
- No-fail recipe.
Ingredients and Substitutions
- Mutton - For making this Hyderabadi mutton biryani use bone-in goat meat (from the shoulder or the leg), cut into big pieces. Or you can also use lamb meat.
- Rice - Use aged, long grain basmati rice for making this biryani. You can get several brands of basmati rice in the market. Select the one that states biryani rice.
- Yogurt/Curd - I have used homemade curd for this recipe. It is used as a tenderizer. You can also use store-bought curd or yogurt. Make sure it is fresh. Fresh curd/yogurt tastes slightly sweet.
- Flavoring - salt, ginger-garlic paste, turmeric, red chili powder, cumin powder, and coriander powder.
- Biryani Masala Powder - You can easily purchase it online or at an Indian/Asian grocery store near you.
- Whole spices - Cloves, cardamom, cinnamon, black stone flower, caraway seeds, star anise, black peppercorn, and bay leaf. If you do not have any one or two of these spices you can skip it. Add whatever whole spices you have on your hand.
- Herbs - Fresh Coriander leaves (cilantro) and mint leaves.
- Green chilies - This is optional. If you do not prefer spicy then skip adding it.
- Tomatoes - I have used fresh plum tomatoes for this recipe. You can also use canned tomatoes.
- Onions - I have used red onions for this recipe. You can substitute it with yellow onions.
- Saffron - This is optional. It adds a very nice flavor and aroma to the biryani. But skip it if you do not have it.
- Ghee/Clarified butter - Ghee gives richness to biryani and also enhances the flavor. Do not skip adding it.
- Lemon juice
For the detailed list of ingredients & their measurements, please check out the recipe card below.
How to make Hyderabadi Mutton Biryani with step by step photos
For marinating the meat
- In a large mixing bowl, take mutton pieces, curd/yogurt, lemon juice, salt, ginger-garlic paste, turmeric powder, red chili powder, cumin powder, coriander powder, and biryani masala powder, whole spices, coriander leaves, mint leaves, ghee/clarified butter. Mix it well. Cover and keep it marinated for 30 minutes to 1 hour. Better to marinate overnight.


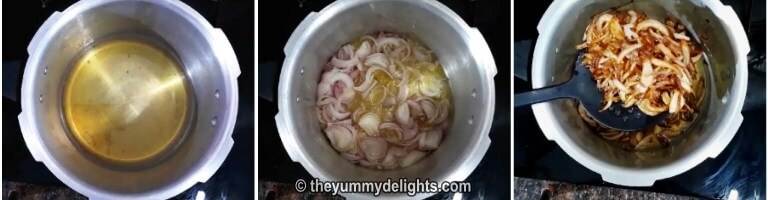
Making birista (crispy fried onions)
- Heat oil in a pressure cooker or any deep bottom pan over high heat. Add sliced onions. Fry it until they are light golden in color.
- Remove half of the onions and keep them on a kitchen tissue.
Pressure cook the mutton
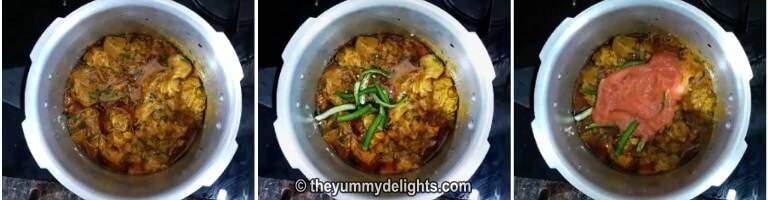
- Now add the marinated mutton to the rest of the onions. Combine and cook it for 2-3 minutes until the marinade comes to a boil.
- Add slit green chilies (optional) and fresh tomato puree to it.
- Add 1 cup of water. Cook it for about 5 minutes or until the oil starts to separate and floats on top.
- Close the lid of the pressure cooker and cook for 4 whistles.

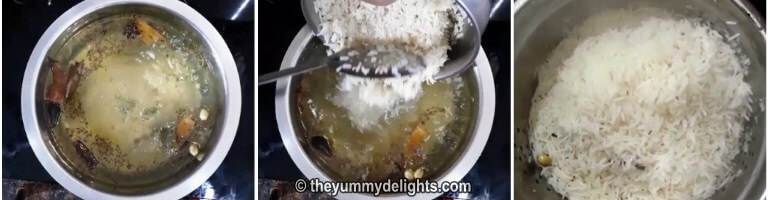
Cooking the biryani rice
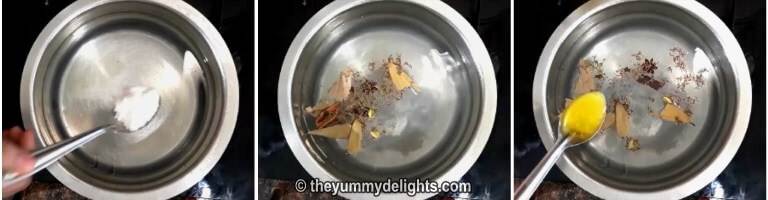
- Meanwhile, we will cook the rice for making biryani. On another burner, heat a vessel with water in it.
- Add salt, ghee/clarified butter, and whole spices. Let the water comes to a boil.
- When the water comes to a boil, add the drained rice.
- Cook it until it is 80% done. We will cook it further while layering it with the mutton. Remove and keep it aside.
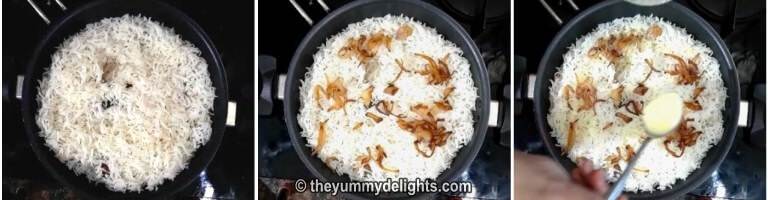
Layering the mutton dum biryani
- After 4 whistles let the pressure of the pressure cooker settle down on its own. After that open the lid and check whether the meat is cooked. If yes, then start layering the biryani, and, if not, then pressure cook for 2 more whistles.
- For making this biryani, I have used tender meat and it gets cooked easily in 4 whistles. But if your meat is not tender then you need to cook it for more whistles (maybe 10-12).
- For layering the biryani, take a heavy bottom pan.
- Place it over a Tawa (or griddle). Apply some oil to the pan before you start layering. Layer the meat first.
- Over it layer the rice.
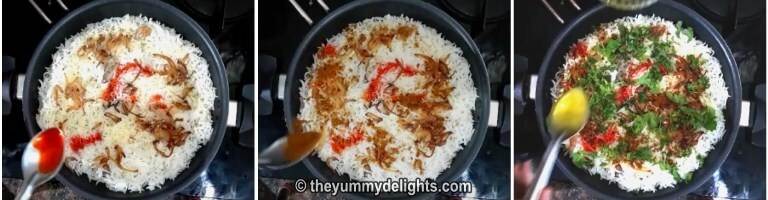
- Now over it sprinkle fried onions, chopped coriander and mint leaves, saffron milk (optional), kewra essence (optional), biryani masala powder, and ghee/clarified butter.


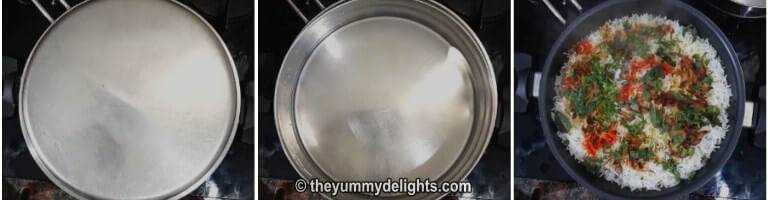
Dum cooking the mutton biryani
- Cover the pan with a tight-fitting lid.
- Here, I have put a plate to cover it. Now over the plate, I have put a vessel filled with water for weight to ensure the lid gets tightly fitted to the pan and the steam is trapped inside.
- Cook the meat on Dum for 20 minutes on low heat. Remove from heat. Keep it aside for 5 minutes.
- Alternatively, you can also use the wheat flour dough to seal the biryani pot or use aluminum foil to seal it.
- Check at the bottom, if the gravy is dried up completely, mutton biryani is ready to serve. If the gravy isn't dried up then keep the flame on low and let it cook uncovered for 5 minutes.
- Serve mutton biryani with Raita and Salad.
Tips to make the best mutton biryani
- Meat tenderizer - In this recipe, I used tender meat to make this biryani. Also, yogurt is used as a meat tenderizer here. If the meat is not tender then use raw papaya paste. Raw papaya acts as a natural meat tenderizer.
- Marinate the mutton overnight. The longer it marinates the better it tastes. Mutton needs to be marinated for at least 6-8 hours. It helps the mutton to become tender and soak all the flavors of the marinade. After marinating the mutton, cover it and keep it in the refrigerator.
- If you are using a meat tenderizer then marinate for 2 hours only. No need to marinate longer.
- If you do not have all the whole spices mentioned in the ingredient list then add some that are available in your kitchen pantry.
- Addition of ghee while cooking the biryani rice is important. It makes the biryani rice soft and moist. Also, it enhances the flavor of biryani.
- Cook biryani rice until it is 80% done. Never cook the rice completely. When you press a rice grain between your thumb & index finger it should split. If it gets mashed up then you will not be able to cook biryani on dum. Better not to use this rice for making biryani.
- Use a heavy bottom vessel to cook mutton biryani on dum. For dum cooking, you keep the biryani in a sealed pot, for further cooking, over low heat. If the biryani is made in a heavy bottom vessel then there is less chance of it getting burnt from the bottom.
- The addition of kewra essence is optional but it enhances the aroma of biryani. Skip if you do not have it.
- Use fresh curd/yogurt for making biryani. If using sour curd then do not use lemon juice in the recipe. Curd/yogurt also acts as a natural meat tenderizer. The acid in the yogurt helps to tenderize the meat.
- Use homemade biryani masala powder for making aromatic and flavorful biryani at home. Freshly grounded biryani masala enhances the flavor of the dish.
FAQ
Use the Goat meat (from the shoulder or the leg) for making this biryani. Or you can use lamb meat too.
Use raw papaya paste while marinating the mutton. The Papain enzyme present in green papaya or raw papaya breaks down the meat fibers.
Cut the raw papaya into cubes (Do not remove the outer green skin but remove the middle seed part). Put it in a mixer or grinder jar & make a paste.
Use about 4 teaspoon of it while marinating 500 gm of mutton. Marinate for 1-2 hours.
Nowadays, meat tenderizers are easily available at meat shops or superstores too.
Serving Suggestions
- Serve it with raita or Mirchi ka salan. Also, you can serve some salad with it. Salad may include onion & cucumber slices & a lemon wedge.
Storage Suggestions
- Store the leftovers within 2 hours of cooking. Let it cool down completely. Transfer it to an airtight container in the refrigerator. Stays good for 2 days. Reheat and serve.
- You can also freeze this biryani. It stays good for a month. Thaw, reheat, and serve. Do not restore the biryani once you thaw it.
If you make this recipe, please leave a comment and a starred review below.
And, consider following me on social media so we can stay connected. I’m on Facebook, Pinterest, and YouTube!
Recipe Card
Hyderabadi Mutton Biryani
Video
Equipment
- 1 Pressure Cooker
- 1 Heavy bottom pan
- 1 Deep bottom vessel
Ingredients
For marinating the meat
- 500 gm bone-in goat meat (mutton) (from the shoulder or the leg), cut into big pieces
- ¾ cup curd/yogurt (dahi)
- 1 lemon juiced
- salt
- 2 tablespoon ginger garlic paste
- ¼ teaspoon turmeric powder (haldi powder)
- 1 teaspoon red chili powder (lal mirch powder)
- ¼ teaspoon cumin powder (jeera powder)
- ½ teaspoon coriander powder (dhaniya powder)
- 1 tablespoon biryani masala powder
Whole Spices to be used in marinating the mutton
- 5 cloves (laung)
- 1 black cardamom (kali elaichi/ badi elaichi)
- 2 inch cinnamon sticks (dalchini)
- 1 black stone flower (optional) (dagad phool)
- 1 teaspoon caraway seeds (shahi jeera)
- 2 green cardamoms (hari elaichi/choti elaichi)
- 1 star anise (chakra phool)
- 1 teaspoon black peppercorns (kali mirch)
- 2 small bay leaf (tej patta)
- ¼ Cup coriander leaves (hari dhaniya),chopped
- 2 tablespoon mint leaves (pudina patta), chopped
- 4 tablespoon ghee/clarified butter
To Pressure cook the meat
- 3 green chilies, slit
- 2 tomato (puree the fresh tomatoes in a blender jar and use it.)
- 1 cup water
For cooking the rice
- 2 cups basmati rice (long grain , aged basmati rice preferred)
- 7 cups of water
Whole Spices to be used while cooking the biryani rice
- 2 small bay leaf (tej patta)
- 1 teaspoon caraway seeds (shahi jeera)
- 2 green cardamoms (hari elaichi/ choti elaichi)
- 1 star anise (chakra phool)
- 1 black cardamom (kali elaichi/badi elaichi)
- 1 inch cinnamon sticks (dalchini)
- 4 cloves (laung)
- 2 teaspoon ghee (clarified butter)
- salt as per taste
For making fried onions or birista
- 3 onions medium size
- oil for deep frying
For layering mutton biryani
- a pinch of saffron soaked in ¼ cup of warm milk (kesar)
- 2 tablespoon coriander leaves (hari dhaniya)
- 1 tablespoon mint leaves (pudina patta)
- 2 drops kewra essence (mix it in 2 teaspoon water and then add it)
- 2 teaspoon of ghee/clarified butter
To garnish
- coriander leaves (hari dhaniya)
- mint leaves (pudina patta)
- fried onions or birista
Instructions
For marinating the meat
- In a large mixing bowl take mutton pieces, curd/yogurt, lemon juice, salt, ginger garlic paste, turmeric powder, red chili powder, cumin powder, coriander powder, biryani masala powder, whole spices, coriander leaves, mint leaves, ghee/clarified butter. Mix it well and cover it. Keep it marinated for 30 minutes to 1 hour. Better to marinate it overnight.
Pressure cook the mutton
- Heat oil in a pressure cooker or any deep bottom pan over high heat. Add sliced onions. Fry it until they are light golden in color. Remove half of the onions and spread it on a plate.
- Now add the marinated meat to the rest of the onions in the pressure cooker. Mix it well. Combine and cook it for 2-3 minutes until the marinade comes to a boil.
- Add slit green chilies (optional) and tomato puree to it. Add 1 cup of water. Cook it for about 5 minutes or until the oil from the masala starts to separate and floats on the top. Close the lid of the pressure cooker and cook for 4 whistles.
Cooking the rice
- Meanwhile, we will cook the rice. On another burner, heat a vessel with water in it. Add salt, ghee/clarified butter, and whole spices. Let the water come up to a boil.
- When the water comes to a boil, add the drained rice. Cook it till 80% done. We will cook it further while layering the mutton. Remove and keep it aside.
Layering the mutton biryani
- After 4 whistles let the pressure of the pressure cooker settle down on its own. After that open the lid and check whether the meat is cooked. If yes, then start layering the mutton biryani and, if not, then pressure cook for 2 more whistles.
- For layering the mutton biryani, take a heavy bottom pan or a non-stick pan. Place it over a tawa. Apply some oil on the pan before you start layering. Layer the meat first. Over it layer the rice. Now over it sprinkle fried onions, chopped coriander and mint leaves, saffron milk, kewra essence, biryani masala powder and ghee/clarified butter.
Dum cooking mutton biryani
- Cover the pan with a tight-fitting lid. Here I have covered it with a plate and over it put some weight on it to ensure that the steam is trapped inside.
- Cook the meat on Dum for 20 minutes. Remove from heat. Keep it aside for 5 minutes. Alternatively, you can also use the dough to seal the biryani pot or aluminum foil.
- Check at the bottom if the gravy is dried up completely, mutton biryani is ready to serve.
- Serve Hyderabadi mutton biryani with Raita and Salad.
Notes
- Meat tenderizer - In this recipe, I used tender meat to make this biryani. Also, yogurt is used as a meat tenderizer here. If the meat is not tender then use raw papaya paste. Raw papaya acts as a natural meat tenderizer.
- Marinate the mutton overnight. The longer it marinates the better it tastes. Mutton needs to be marinated for at least 6-8 hours. It helps the mutton to become tender and soak all the flavors of the marinade. After marinating the mutton, cover it and keep it in the refrigerator.
- If you are using a meat tenderizer then marinate for 2 hours only. No need to marinate longer.
- If you do not have all the whole spices mentioned in the ingredient list then add some that are available in your kitchen pantry.
- Addition of ghee while cooking the biryani rice is important. It makes the biryani rice soft and moist. Also, it enhances the flavor of biryani.
- Cook biryani rice until it is 80% done. Never cook the rice completely. When you press a rice grain between your thumb & index finger it should split. If it gets mashed up then you will not be able to cook biryani on dum. Better not to use this rice for making biryani.
- Use a heavy bottom vessel to cook mutton biryani on dum. For dum cooking, you keep the biryani in a sealed pot, for further cooking, over low heat. If the biryani is made in a heavy bottom vessel then there is less chance of it getting burnt from the bottom.
- The addition of kewra essence is optional but it enhances the aroma of biryani. Skip if you do not have it.
- Use fresh curd/yogurt for making biryani. If using sour curd then do not use lemon juice in the recipe. Curd/yogurt also acts as a natural meat tenderizer. The acid in the yogurt helps to tenderize the meat.
- Use homemade biryani masala powder for making aromatic and flavorful biryani at home. Freshly grounded biryani masala enhances the flavor of the dish.
Nutrition
Nutrition information is automatically calculated, so should only be used as an approximation.


Priyanka
Hello. First and foremost Oh My God! I love your recipe. I have made it countless times and it’s just brilliant. Second, what changes do I make if I want to make this into a chicken dum biryani? Please help.
Preeti
Thanks a lot. Glad you liked it.
For chicken - pressure cook for 2 whistles. Continue with the same steps as mentioned in this mutton biryani recipe.
For spices, you can follow this recipe - https://theyummydelights.com/hyderabadi-chicken-dum-biryani/
or making chicken biryani in pressure cooker - https://theyummydelights.com/chicken-biryani-in-pressure-cooker/
Priyanka
Can I follow the mutton recipe exactly as it is for chicken and just reduce pressure to 2 whistles? Or is there a reason apices have been reduced while cooking the rice?
Preeti
Yes you can follow the same recipe. Try it and let us know.
Muhammad Atif Dar
I am learner of food industry really like to learn a new dishes my profession is chef I'm working for last 15 year
Ravi
Wow. ..tasty biryani. ..
Preeti Nayak
Thanks 🙂
Anilkumar
Nice recipe... Step by step explanation is what I liked the most.. Mouthwatering Biryani 🙂 I will try it
Preeti Nayak
Thanks. Please do share your feedback with us.
Elana
What a brilliant, from scratch recipe. I am going to make this for my next dinner party! Thank you very much for all the attention to detail!
Lin
Hi, you mentioned to add one cup of water before the mutton begins cooking in the pressure cooker. When the mutton was finished cooking, there was a lot of gravy in the pressure cooker. Can you explain what to do with all that gravy? Did you use all the gravy when layering the biriyani before the dum process? I'm afraid of it being too watery. Thanks. Please advise.
Preeti
Good question.
1) First of all, there isn't a lot of gravy. I used it all. Transfer the mutton and gravy to a pot where you will start layering the biryani. The rice isn't completely cooked and you need liquid to cook rice. Also, if there isn't enough liquid in the base of the pot there is a possibility that the biryani may get burnt or stick to the base of the pan.
2) Also, make sure the curd/yogurt that you are using is thick not watery.
3) But, if you feel there is a lot of liquid then do not use it all. It will make biryani mushy. Keep extra liquid aside. You can use it later to serve it with biryani as biryani gravy.