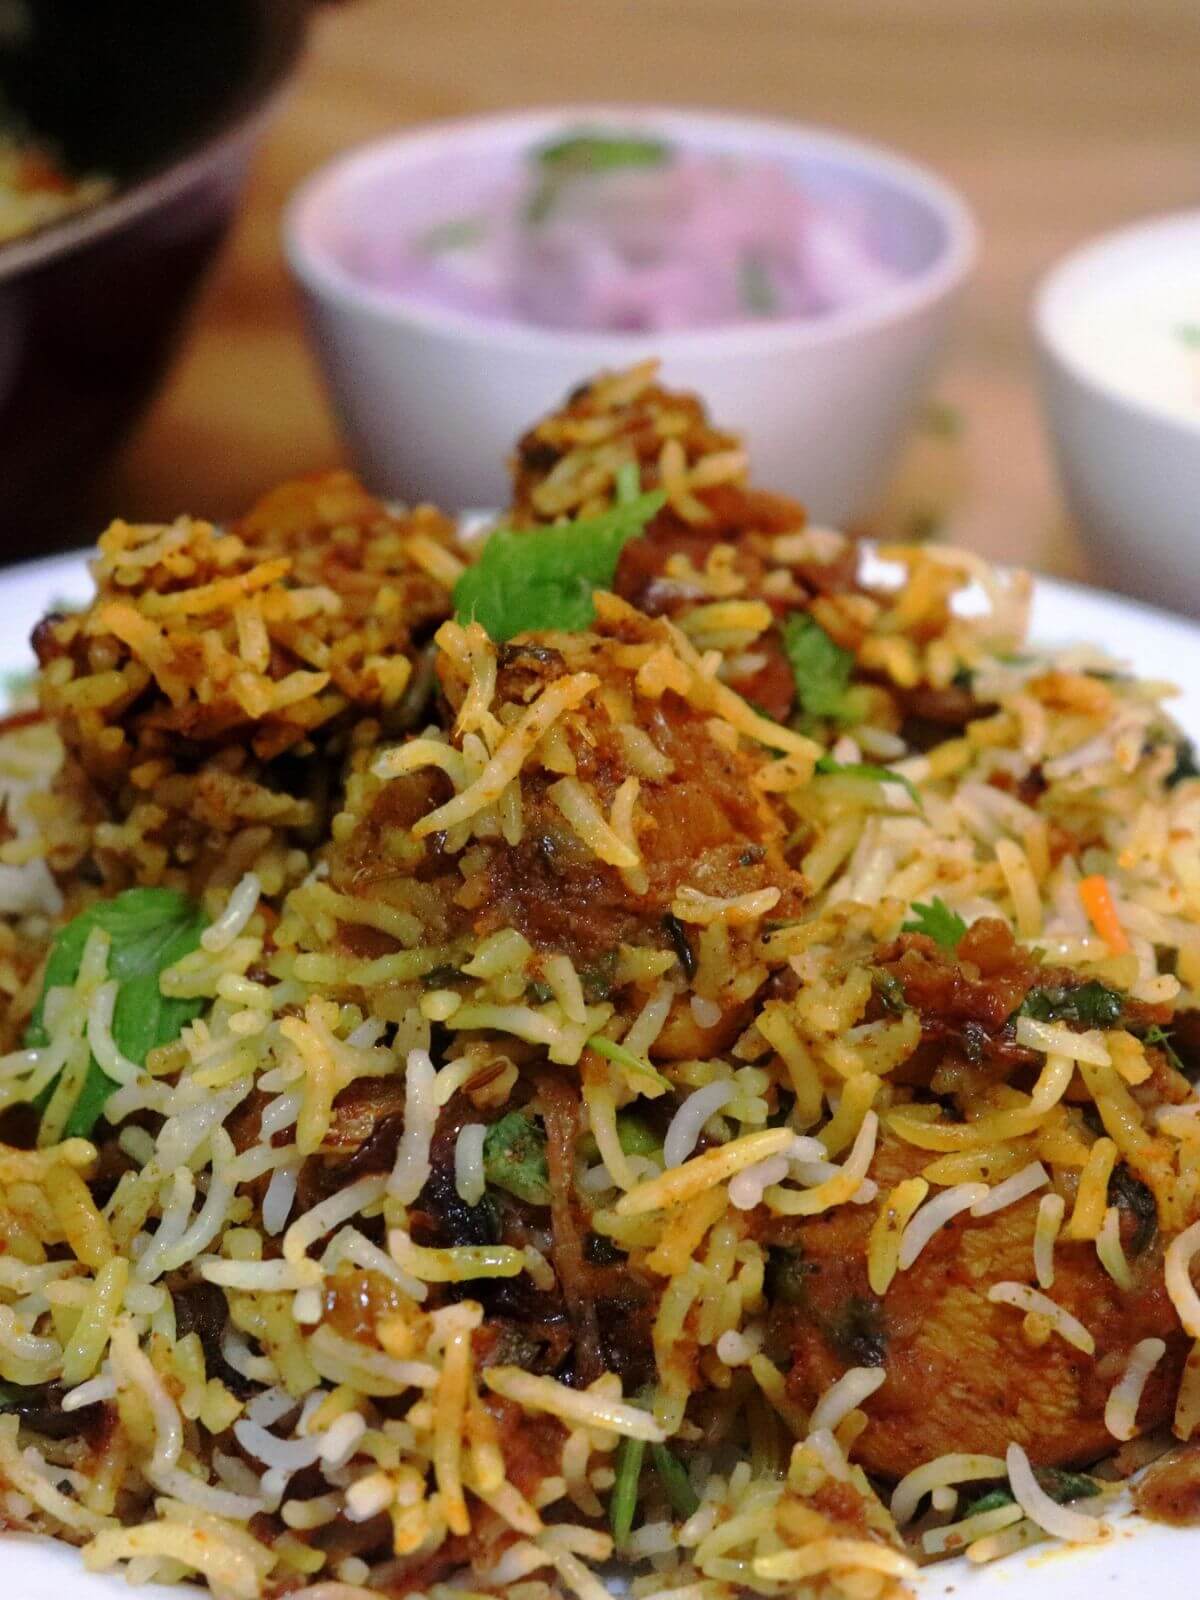
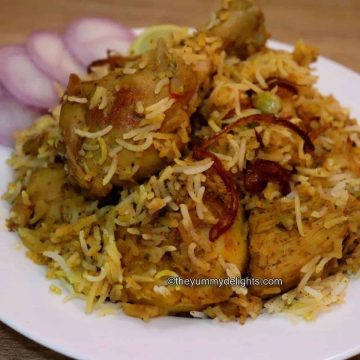
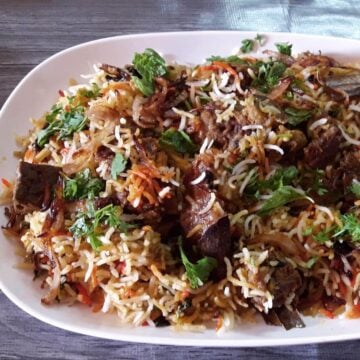
Learn the secrets of making a restaurant-worthy Hyderabadi Chicken Dum Biryani at home. This authentic chicken dum biryani recipe is prepared with tender chicken, fragrant basmati rice, yogurt, spices, and herbs. It includes stepwise photos and a quick video tutorial for beginners. Serve with raita, salad, or salan for a satisfying family-friendly meal.
What sets this Hyderabadi chicken dum biryani recipe apart? We've perfected the delicate balance of flavors and textures you expect from your favorite restaurants. We're sharing our secret to achieving fluffy, fragrant biryani rice packed with just the right amount of spices. Even if you've never cooked biryani before, our easy-to-follow guide will help you create an authentic Hyderabadi biryani at home.
Hyderabadi chicken biryani is a classic Indian delicacy from the kitchens of the Nizam of Hyderabad. It's a famous rice dish with amazing flavors. As a true foodie, I can't resist the rich flavors of Hyderabadi cuisine. From the fiery Hyderabadi Chicken Masala to the aromatic Hyderabadi Mutton Biryani, or Egg Biryani and the delectable Hyderabadi Green Chicken – they're simply irresistible.
About This Chicken Dum Biryani
In this post, I am sharing the tried and tested authentic Hyderabadi chicken dum biryani recipe. Hyderabadi biryani is prepared in two styles - kacchi and pakki biryani. Here in this recipe post, I am sharing Kacchi biryani (also known as Kacche murgh ki biryani or kachi yakhni biryani) which is considered the more authentic and flavorful version. Pakki biryani is a quicker alternative with a slightly different taste profile but both are equally flavorful.
I have updated this recipe to make it simple. There is less use of complicated spices. But I promise you that you will get the same restaurant-style flavor with this easy biryani recipe. You can never go wrong with this recipe.
Making a perfect chicken dum biryani at home needs a bit of experience, patience, and overall a good understanding of the time and temperature to cook biryani.
In this Hyderabadi chicken dum biryani recipe, we have carefully recorded the timings to cook the biryani so that you get perfect restaurant-style Hyderabadi chicken dum biryani flavors at home every time you make it.
You can make a Hyderabadi biryani recipe in 5 simple steps.
- Prep your ingredients: Soak basmati rice, fry onions for birista and garnishing, and marinate chicken.
- Cook the biryani rice: Boil salted water with spices, add rice, and cook until 80% done. Drain excess water.
- Layer the biryani: Arrange marinated chicken, fried onions, and partially cooked rice in layers in a heavy-bottomed vessel. Add biryani masala, fried onions, herbs, and ghee.
- Dum cooking: Seal the pot with dough, cook on medium heat for 15 minutes, then low heat for 7 minutes. Transfer to a hot tawa and cook for another 15 minutes. Let it rest for 10 minutes.
- Serve: Carefully open the pot, check for excess moisture, and enjoy the aromatic Hyderabadi Chicken Dum Biryani with raita or mirchi ka salan.
Ingredients Notes
Hyderabadi Chicken Dum Biryani is a flavorful, royal dish that requires a long list of ingredients, but many are likely already in your kitchen if you enjoy cooking Indian food. From fragrant basmati rice to tender chicken and aromatic spices, every ingredient is important to create an extraordinary taste. Both Kacchi and Pakki Biryani recipe uses the same ingredients. Let’s see the list of ingredients that transform a simple rice dish into a royal feast.
- Rice - For making this Hyderabadi chicken dum biryani, I have used long-grain aged basmati rice. Its delicate flavor and fluffy texture absorb the rich spices without becoming mushy, creating a restaurant-quality dish.
- Chicken - You can use either boneless or bone-in chicken for this Hyderabadi biryani recipe. I prefer bone-in chicken for the best flavors.
- Herbs - I have used fresh coriander leaves and mint leaves. Chicken biryani is a spicy dish & mint leaves give a cooling effect to the body. Coriander leaves impart a refreshing aroma to this biryani dish.
- Spice powders - I have used turmeric powder, red chili powder & biryani masala powder.
- Curd/Yogurt - Use fresh homemade curd. Or you can use Greek yogurt.
- Onion - Onions are required to make fried onions, commonly known as birista. If you are using store-bought birista then skip it.
- Oil - You can use any cooking oil that does not have a strong aroma.
- Whole spices - Caraway seeds, green cardamom, black cardamom, cinnamon. If you do not have caraway seeds then skip it. But add cinnamon & cardamom.
- Saffron milk - a pinch of saffron soaked in ¼ cup hot milk. If you do not have saffron then add ¼ cup of plain milk or ¼ cup of water.
- Kewra essence (optional) - Gives a nice aroma to the dish. If you do not have it, skip it.
- Ghee/clarified butter - It makes the chicken dum biryani rice nice & moist. Also, the authentic flavor of chicken biryani is incomplete without it. Do not skip it.
For the detailed list of ingredients & their measurements, please check out the recipe card below.
How to make Hyderabadi Chicken Dum Biryani with step by step photos
Preparations for chicken dum biryani
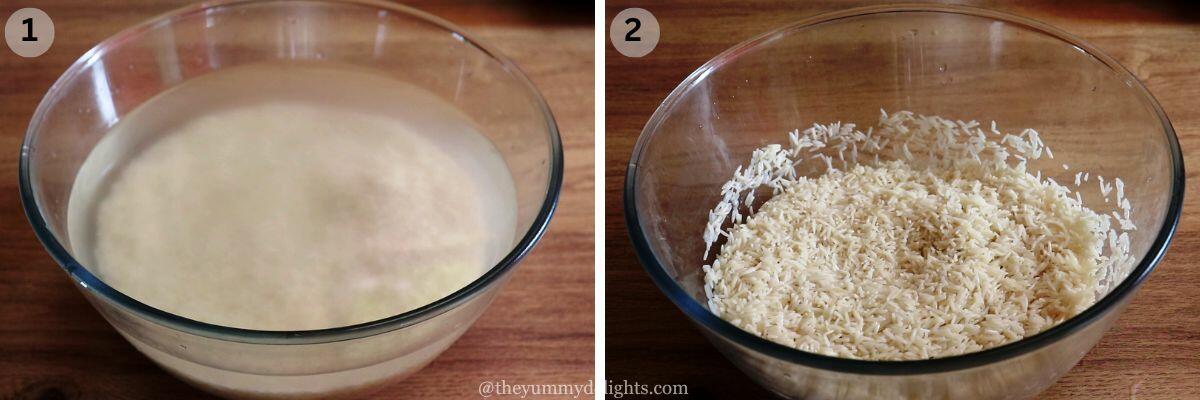
1) Soaking the basmati rice - Wash and soak basmati rice in water for 30 minutes to 1 hour. This step is important, so don't skip it. Drain the excess water from the rice and set it aside.
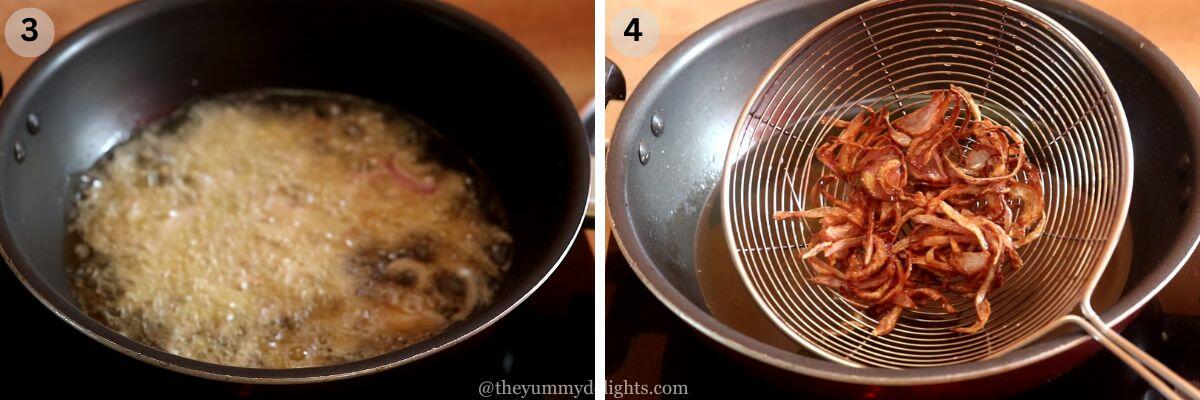
2) Preparing fried onions or birista - Heat oil in a pan over medium heat. Fry the onion slices in batches until they turn light golden brown. Be careful not to burn them, as this will impart a bitter taste. Remove the onions from the pan and drain the excess oil on a paper towel. Save the oil used for frying the onions; it will be used to marinate the chicken.
Marinating the chicken
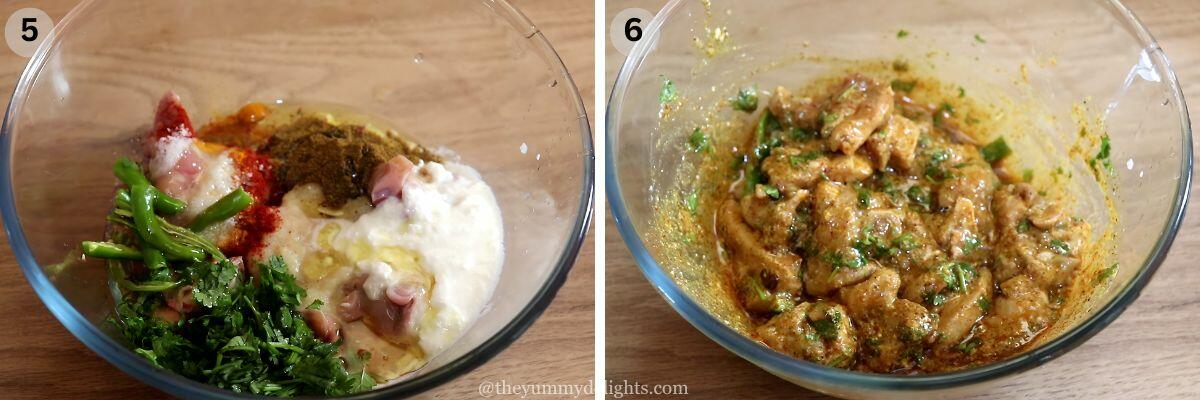
3) In a large bowl, combine the chicken pieces with the ingredients listed under the "Marinating the Chicken" section. Mix thoroughly. Marinate the chicken for at least 2 hours, or preferably overnight, in the refrigerator. The longer the chicken marinates, the more flavorful it will be.
Cooking biryani rice
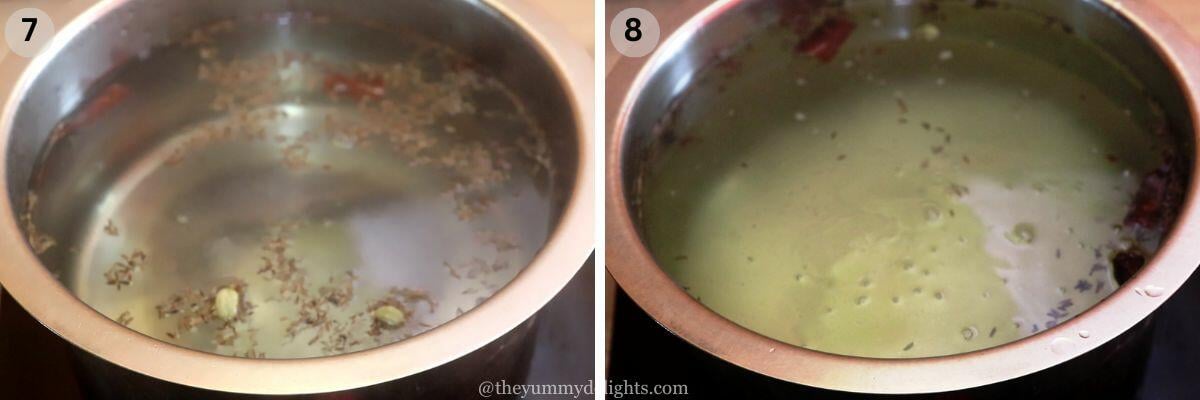
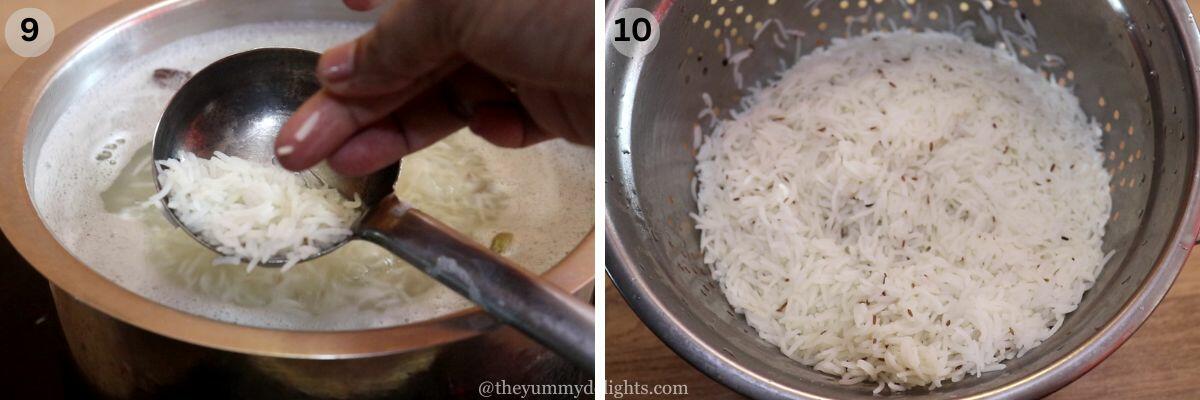
4) Boil 7 cups of water in a vessel and add salt & whole spices. Add rice to boiling water (image 7). Cook for 5 minutes or until the water comes to a boil (image 8). Check the rice (80% cooked or not). If you press them between your thumb and forefinger, they will split (not mushy). It means they have a slight bite in them & not completely cooked (image 9). Drain off the water from the rice. Keep it aside (image 10).
Layering the Hyderabadi chicken biryani
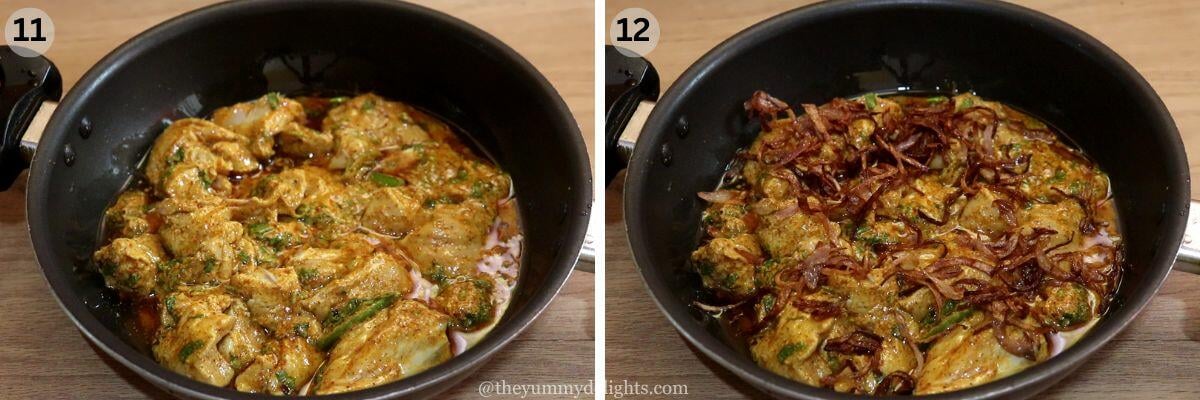
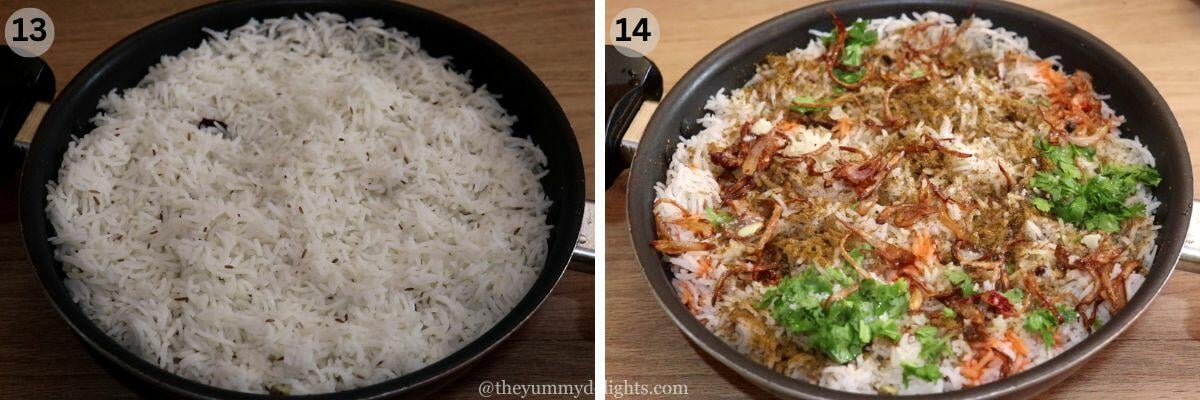
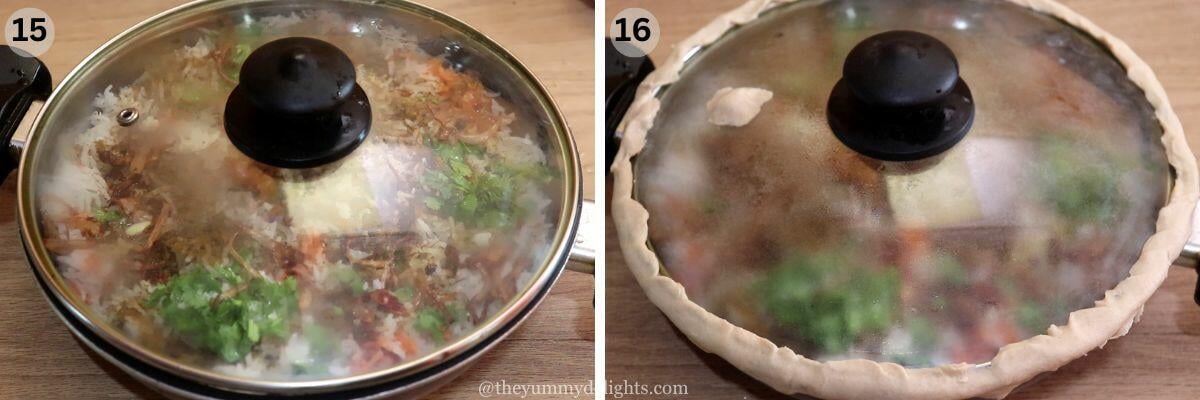
1) In a heavy bottom vessel, apply some oil to coat the base of the vessel. Add the marinated chicken to the base of the vessel. Spread it evenly. Sprinkle some fried onions over it. Now layer the partially cooked basmati rice. Spread it evenly. Over it, sprinkle biryani masala powder, fried onions, coriander leaves, mint leaves, kewra essence (optional), saffron milk & ghee. Cover with a lid.
Dum cooking the hyderabadi chicken biryani
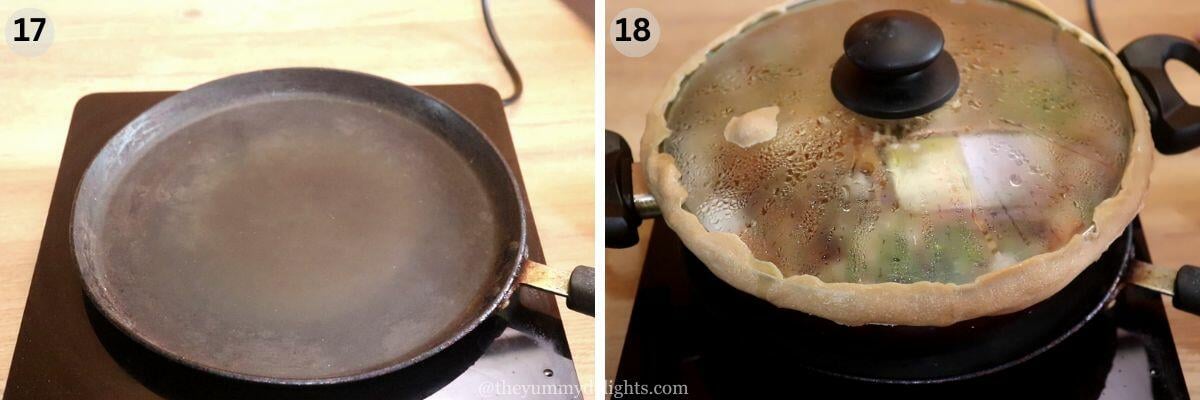
1) Make wheat flour dough by mixing wheat flour with water. Seal the lid of the biryani pot with the dough. If you have a tight-fitting lid then you can skip this step. Switch on the heat. First 15 minutes cook at medium flame. Next 7 minutes, cook on low flame.
2) At the same time, on the other burner keep a Tawa/griddle to heat up. Now place the pot on the heated Tawa/griddle. Cook on a medium flame for 5 minutes. Lower the heat and cook it for 10 minutes. Switch off the heat. Remove from the heat & set it aside for 10 minutes. Hyderabadi chicken dum biryani is ready now.
3) Remove the seal carefully. Make sure to do it slowly if you are doing it for the first time. The sealed dough will become hard after cooking. Slowly open the lid with a knife. The time you open the lid the aroma of the biryani spices will fill your home.
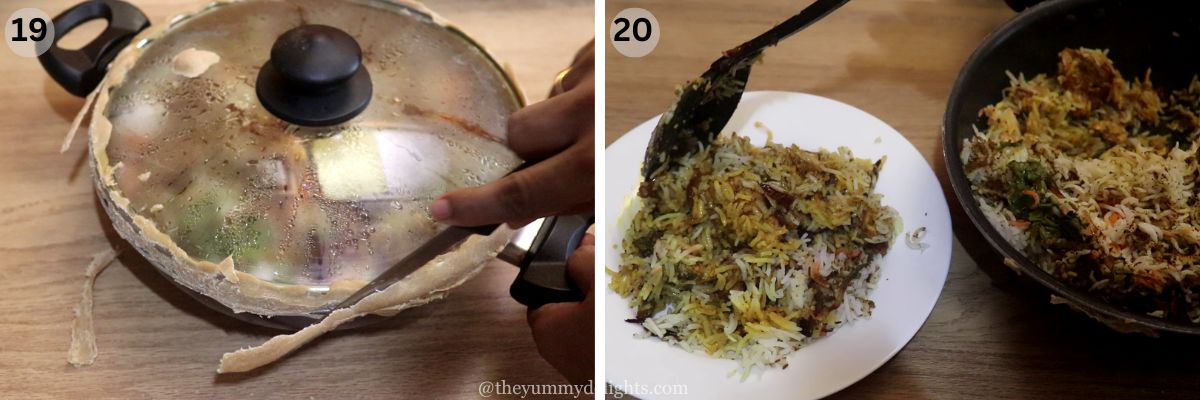
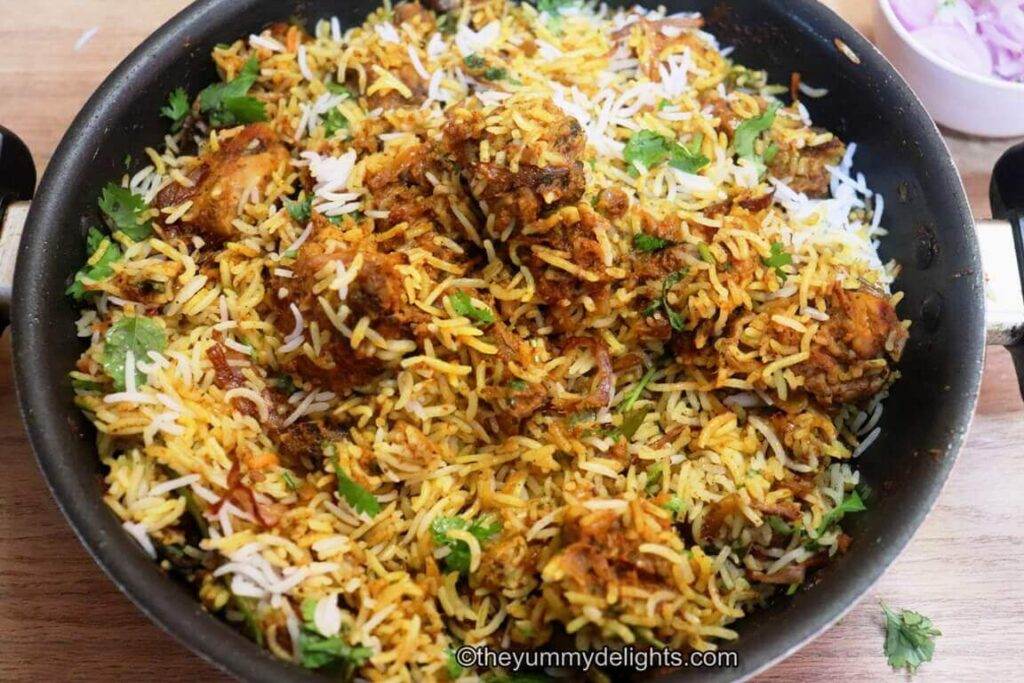
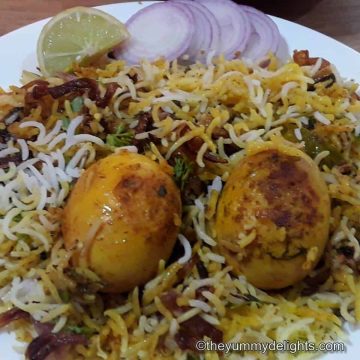
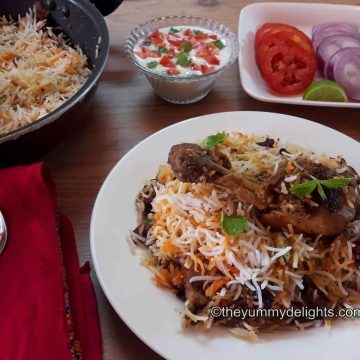
4) Check at the base of the pot. If there is any gravy or moisture then heat the biryani vessel over a low heat until the gravy dries up. Enjoy this Hyderabadi Style Chicken Dum Biryani with Raita or Mirchi ka Salan, onion slices & lemon wedge this weekend.
Tips to make the best Hyderabadi chicken dum biryani
- The curd/yogurt should not be too thick or thin. Make use of fresh curd. Do not use lemon juice if using sour curd.
- Rinse the rice well with water until the cloudiness of water is gone. It will remove the excess starch from it that may cause the rice grains to be sticky.
- Soaking the basmati rice is an important step. It cuts down the cooking time of rice and makes the rice grains long and fluffy when cooked.
- While frying the onions for making birista, do not put too much onion in the oil. It will reduce the temperature of the oil. Also, make sure the oil is hot otherwise the onion slices will not be crispy.
- Also, after frying the onions, do not stack the onions one on another otherwise, the onions will not be crisp. Spread it evenly on a plate.
- Chicken dum biryani is incomplete without ghee/clarified butter.
- Don't skip adding ghee while layering the rice in the biryani pot. Ghee keeps the rice moist & soft. Also, the addition of ghee increases the flavor too.
- Use a thick bottom pan for making this hyderabadi-style chicken dum dish. Or you can place it over a heated iron griddle or Tawa if you do not have a heavy bottom pan.
- You can add a few drops of rose or kewra essence while layering the rice. Make sure to add only 2-3 drops. Check how concentrated is your essence first and then add it accordingly. Otherwise, it will spoil your dish completely by overpowering its flavor.
- Seal the biryani pot properly. If the steam will escape, you will never get the biryani right. Either it will result in dry rice or the biryani rice sticking to the bottom of the pot.
- After sealing, if you find the steam is escaping from any side, stick the dough on that side & seal it again. Alternatively, you can seal the pot with Aluminum foil too.
- If you have a heavy lid that will not let the steam escape, you can use that to cover the pot. No need to seal the pot.
- I noted down the exact cooking time for the dum process while preparing this Hyderabadi chicken dum biryani recipe. Please follow the timings exactly.
Frequently Asked Questions
You can serve this Hyderabadi biryani with Mirchi ka salan, Hyderabadi chicken masala, Hyderabadi Hariyali chicken curry, raita, Dahi ki chutney, baghaar-e-baingan, or salad.
Basmati rice has a unique aroma, stays fluffy when cooked, absorbs flavors, and looks beautiful in biryani. That's why I prefer basmati rice to make biryani. Yes, you can use different types of rice like medium-grain rice. But make sure they cook fluffy.
Yes, you can make it with lamb or goat meat.
Dum Biryani is made using the "dum pukht" method. Dum pukht in the Persian language means "slow breathing oven".
All the ingredients for making biryani are put inside the biryani pot. The lid of the pot is sealed around the edges with wheat flour dough. It is then slow-cooked over hot charcoal.
As a result, the biryani inside gets cooked in its own steam. The pot is kept sealed until it is ready to be served. It keeps all the wonderful aroma of the spices intact.
1) Pulao/pilaf is cooking together, rice and vegetables or meat while biryani consists of a separate layer of rice and meat in it.
2) Biryani has a lot more spices and flavors as compared to pulao or pilaf.
Storing & Reheating Hyderabadi Biryani
- To store leftover Hyderabadi chicken dum biryani, store it within 2 hours of cooking. Let it come to room temperature, transfer it to an airtight container and refrigerate. Label it with the date. Stays good for 2 days.
- Place it in the freezer. Stays good for 2 weeks.
- When needed, thaw it. Take it out in a microwave-safe bowl/plate. Sprinkle some water over it & reheat it in the microwave.
- Store it in small portions & take out the quantity you are ready to consume. Reheat only that portion. Do not reheat the biryani again & again. It will lose the flavors, texture & aroma.
If you make this Hyderabadi chicken dum biryani recipe, please leave a comment and a starred review below.
And, consider following me on social media so we can stay connected. I’m on Facebook, Pinterest, and YouTube!
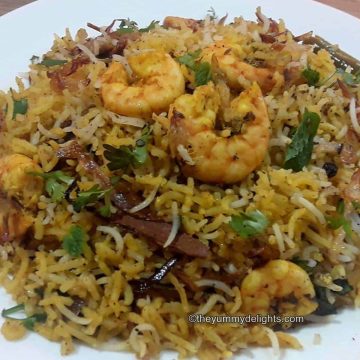
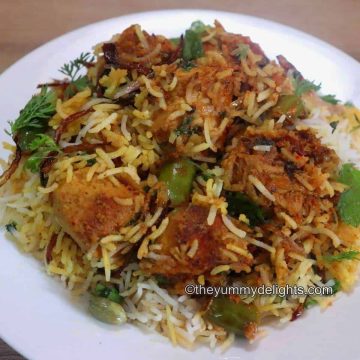
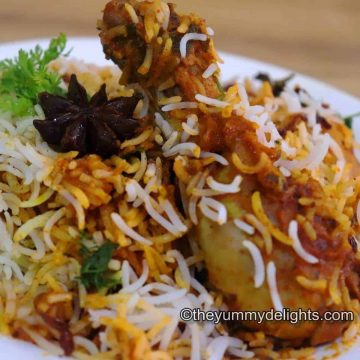
More Biryani Recipes You Might Like
- Pressure Cooker Chicken Biryani
- Hyderabadi Prawn Biryani Recipe
- Chicken Tikka Biryani (step by step photos + video) |Creamy Chicken Biryani Recipe
- Kolkata Chicken Biryani (Bengali Biryani)
- Butter Chicken Biryani
- Hyderabadi egg biryani recipe | easy egg dum biryani (restaurant-style)
- Hyderabadi Mutton Biryani
- Awadhi Chicken Biryani recipe (Lucknowi Chicken Biryani)

Recipe Card

Hyderabadi Chicken Dum Biryani
Video

Ingredients
for preparing the rice
- 2 cups basmati rice, long-grain, aged
- 7-8 cups water
- salt to taste
for making fried onions (birista)
- 2 onions medium size, sliced
- oil for deep frying
for marinating the chicken
- 500 gram chicken, cut into bite size pieces (bonless or with bones both work fine)
- 2 tbsp ginger-garlic paste
- 4 tablespoon thick curd/yogurt
- 2 teaspoon biryani masala powder
- ¼ teaspoon turmeric powder
- 1 teaspoon red chili powder
- salt to taste
- 2 tablespoon chopped mint leaves
- 4 tablespoon coriander leaves
- 2 green chilies slit
- 2 tablespoon lemon juice
- 3 tablespoon oil (used to fry onions)
- ¼ cup fried onions
Whole spices to cook rice
- 1 teaspoon shahi jeera (caraway seeds)
- 2 green cardamom
- 1 black cardamom
- 2 -inch dalchini (cinnamon)
for Assembling & Layering the chicken biryani
- a pinch saffron strands (optional) (soaked in ¼ cup of hot milk)
- 3 teaspoon ghee/clarified butter
- ½ cup chopped coriander leaves
- ¼ cup chopped mint leaves or pudina
- 2 tablespoon fried onions
- 1 teaspoon biryani masala powder
Instructions
Preparations
- Making birista (fried onions) - Heat oil in a heavy bottom pot on medium heat. Fry the onion slices in batches until they start to become light golden brown. But be careful don't burn them. Remove and drain out the excess oil on a kitchen tissue. Reserve the oil that we used for frying the onions (it has amazing flavors), it will be used in marinating the chicken.
- Soaking rice - Wash & soak the basmati rice in water for 30 minutes to 1 hour. Drain off the water. This step is important don't skip it.
- Marinate chicken - Marinate the chicken with the ingredients mentioned under the heading marinating the chicken. Marinate for at least 2 hours or overnight. The longer you marinate the chicken, the better it will taste.
- Cooking rice - Boil water in a vessel. Add salt & whole spices. Add rice to boiling water. Cook for 5 minutes. Check the rice. It should be 80% cooked. If you press them it will split. Drain the rice. Keep it aside.
Assembling Hyderabadi chicken dum biryani
- In a pan/kadhai first, add the layer of marinated chicken in the base. Sprinkle some fried onions over it.
- Now layer the partially cooked basmati rice. Spread it evenly.
- Over it, sprinkle biryani masala powder, fried onions, coriander leaves, mint leaves, kewra essence, saffron milk & ghee. Cover with a lid.
Dum cooking the hyderabadi biryani
- Make a wheat flour dough. Seal the sides of the pan with the dough.
- Switch on the flame. First 15 minutes cook at medium flame. Next 7 minutes cook at low flame.
- At the same time on the other burner keep a tawa/pan to heat up. Place the pot on the heated Tawa/Pan. Cook on medium heat for 5 minutes.
- Lower the heat and cook it for 10 minutes. Switch off the heat. Biryani is done now. Remove from the heat & set it aside for 10 minutes.
- Remove the seal carefully. With the help of a knife slowly open the lid. The time you open the lid the aroma of the biryani spices will fill your home.
- Enjoy Hyderabadi Chicken Dum Biryani with Raita or Mirchi ka Salan, onion slices & lemon wedge this weekend 🙂
Notes
- The curd/yogurt should not be too thick or thin. Make use of fresh curd. Do not use lemon juice if using sour curd.
- Rinse the rice well with water until the cloudiness of water is gone. It will remove the excess starch from it that may cause the rice grains to be sticky.
- Soaking the basmati rice is an important step. It cuts down the cooking time of rice and makes the rice grains long when cooked.
- While frying the onions for making barista, do not put too much onion in the oil. It will reduce the temperature of the oil. Also, make sure the oil is hot or the onion slices will not be crispy.
- Also, after frying the onions, do not stack the onion one on another otherwise, the onions will not be crisp. Spread it evenly on a plate.
- Chicken biryani is incomplete without ghee/clarified butter.
- Don't skip adding ghee while layering the rice because it will keep the rice moist & soft. Also, the addition of ghee increases the flavor too.
- Use a thick bottom pan for making this dish. Or you can place it over a heated iron griddle or Tawa if you do not have a heavy bottom pan.
- You can add a few drops of rose or kewra essence while layering the rice. Make sure to add only 2-3 drops. Check how concentrated is your essence first and then add it accordingly. Otherwise, it will spoil your biryani completely by overpowering its flavor.
- Seal the biryani pot properly. If the steam will escape, you will never get the biryani right. Either it will result in dry rice or the biryani rice sticking to the bottom of the pot.
- After sealing, if you find the steam is escaping from any side, stick the dough on that side & seal it again. Alternatively, you can seal the pot with Aluminum foil too.
- If you have a heavy lid that will not let the steam escape, you can use that to cover the pot. No need to seal the biryani pot.
- I noted down the exact cooking time for the dum process while preparing this Hyderabadi style chicken dum biryani recipe. Please follow the timings exactly.
- Make-ahead recipe: you can make it ahead of time and store it in the refrigerator. Stays good for 2 days. Reheat and serve.
Nutrition
Nutrition information is automatically calculated, so should only be used as an approximation.


Veronika Singh
HI, This is the most simple and best recipe I have ever came across. I followed your instructions religiously and I was very very happy.
Thank you so much, my family and I loved it.
Preeti
Welcome 🙂 Thanks for the feedback. Glad you all liked it.
Shanaya Shaikh
Good recipe...Will try it.