Chocolate drip cake recipe with step-by-step photos and a recipe video. I made this chocolate drip cake first time on my daughter’s birthday.
The drip cake is made with a chocolate sponge cake and delectable chocolate ganache. Chocolates, chocolates and a lot of chocolates!!!
Making a drip cake was on my list for a long time. It turned out great at my first attempt 🙂 This is one of the best chocolate cakes I have shared on this website.
So, if you have never made drip cake and are thinking of making one, this recipe post is just for you. Do try it and share your feedback with us.
About this chocolate drip cake recipe
This chocolate drip cake is made with dark chocolate ganache. The process to make a chocolate drip cake is divided into three easy steps:
- Making whipped chocolate ganache for cake frosting
- Frosting the cake
- Decorating the cake with chocolate drips
So, if you want to decorate the cake with chocolate drips, start directly from STEP 3
The best part of making this drip cake is that you can make it easily at home. I have included all the tips and tricks so that you make perfect drips for the cake every time you make it.
In this recipe post, I am sharing the step-by-step process of making chocolate drip cake. First, we will make the chocolate ganache for frosting and finally decorate the cake with chocolate drips.
Recipe features
- Quick & easy to make
- Easy to customize – see the ingredient list below for alternative ingredients. You can add or skip the ingredients as per your taste.
- Vegetarian - No eggs are used to make this cake.
- Easy step-by-step recipe for beginners.
Ingredients to make Chocolate drip cake
To make Chocolate Ganache
- Dark compound chocolate - You can use any brand of dark compound chocolate. You can substitute it with dark chocolate chips.
- Whipping cream - You can use any dairy or non-dairy whipping cream. Or use heavy cream. Do no use low fat cream or fresh cream.
For the detailed list of ingredients & their measurements, please check out the recipe card below.
How to make Chocolate Ganache?
Sometimes when you heat heavy cream it gets curdled. So, if you are a beginner, try this easy recipe to make chocolate ganache.
- Chop the chocolate compound finely. It will help the chocolate to melt quickly. Or if you are using chocolate chips to make ganache, skip this step.
- Using a double boiler method, melt the chocolate. Stir it while melting the chocolate. You can also microwave it.
- Once the chocolate melts, remove it from heat.
- Add heavy cream to the melted chocolate, stir continuously and mix. Chocolate ganache is ready.
Things to remember while making chocolate ganache:
- Add heavy cream only after the chocolate is completely melted.
- Make sure the heavy cream is at room temperature when you add it to the melted chocolate.
- If the heavy cream is cold (or taken straight out of the refrigerator) then it will set the chocolate and you will find it difficult to mix it with the chocolate.
Tools needed to create chocolate drips
You can use a spoon, squeeze bottle, or a piping bag to create drips.
Tips for perfect chocolate drips
- Make sure the chocolate ganache is warm and not hot. If it is hot then it will not set. The chocolate drips will be runny and will come all the way down.
- Most important tip - The cake should be cold enough or chilled. Place the frosted cake in the refrigerator for atleast 30 minutes to an hour. Take it out from the refrigerator only when you are ready to make the drips. When the dripping chocolate comes in contact with the cold cake, the drips set immediately.
- Always start making the drips on the sides. Once you completed the sides, you can pour the chocolate on top.
- Be careful, do not pour too much chocolate ganache on top. It will come all the way down. It should be just enough to cover the top.
- When you start making the drips, do a test drip. First create a small drip on the side of the cake. Wait to see how long it drips. Then start making the other. It will help you to know whether the consistency is right or not.
Two common mistakes you can make while creating the drips
First, the chocolate drip is thick or hard. The reason can be:
- The ganache is cold. Reheat it until it reaches dripping consistency. Start creating the drips.
- You need to add some more cream to it. Be careful and start with adding only 1 teaspoon cream at a time and mix. Check the consistency. Then start making the drip.
Second, the chocolate drip is too runny. The reason can be:
- The ganache is hot. Let it cool down little bit. Check the consistency and start creating the drips.
- Add some more melted chocolate to it and mix. Set it aside. It gets thick when it cools.
How to make Chocolate drip cake
Step: 1 Making whipped chocolate ganache
- Heat water in a vessel over low heat.
- Place a heat-proof bowl filled with chocolate over it. (image 1)
- Keep stirring the chocolate so that the heat distributes evenly.
- Once the chocolate melts, remove it from heat. (image 2)
- Add heavy cream to this warm chocolate (a little at a time) & mix. (image 3)
- Chocolate ganache is ready. Let it sit for 2 hours at room temperature to set. Or you can make it the day before. Cover the bowl with cling wrap & refrigerate. (image 4)
- Whip the ganache until it becomes double in quantity and light in color. Whipped chocolate ganache is ready. Set it aside. (image 5 & 6)
Step: 2 Frosting the cake with chocolate ganache
- Cut the sponge cake in half. (image 7)
- Apply sugar syrup over it. (Optional). (image 8)
- Next, apply chocolate ganache and spread it evenly using a palette knife. (image 9)
- Place the other half of the sponge cake over it.
- Again pour sugar syrup over it.
- Apply chocolate ganache on the top layer and on the sides of the cake. (image 10)
- Let it sit in the refrigerator for an hour.
Step: 3 Making the chocolate drips
- In a small mixing bowl, melt dark chocolate compound. You can use the same method we use to make the chocolate ganache. (image 11)
- Remove from heat. Add heavy cream to it and mix. (image 12 & 13)
- It should have free-flowing consistency. (image 14)
- Fill it in the piping bag. It is my favorite way to make drips. However, you can also use a spoon or a squeeze bottle to create drips.
- Start making the drips. First, make a smaller drip. For smaller drips apply less pressure on the piping bag to release the chocolate and for longer drips apply more pressure. (image 15)
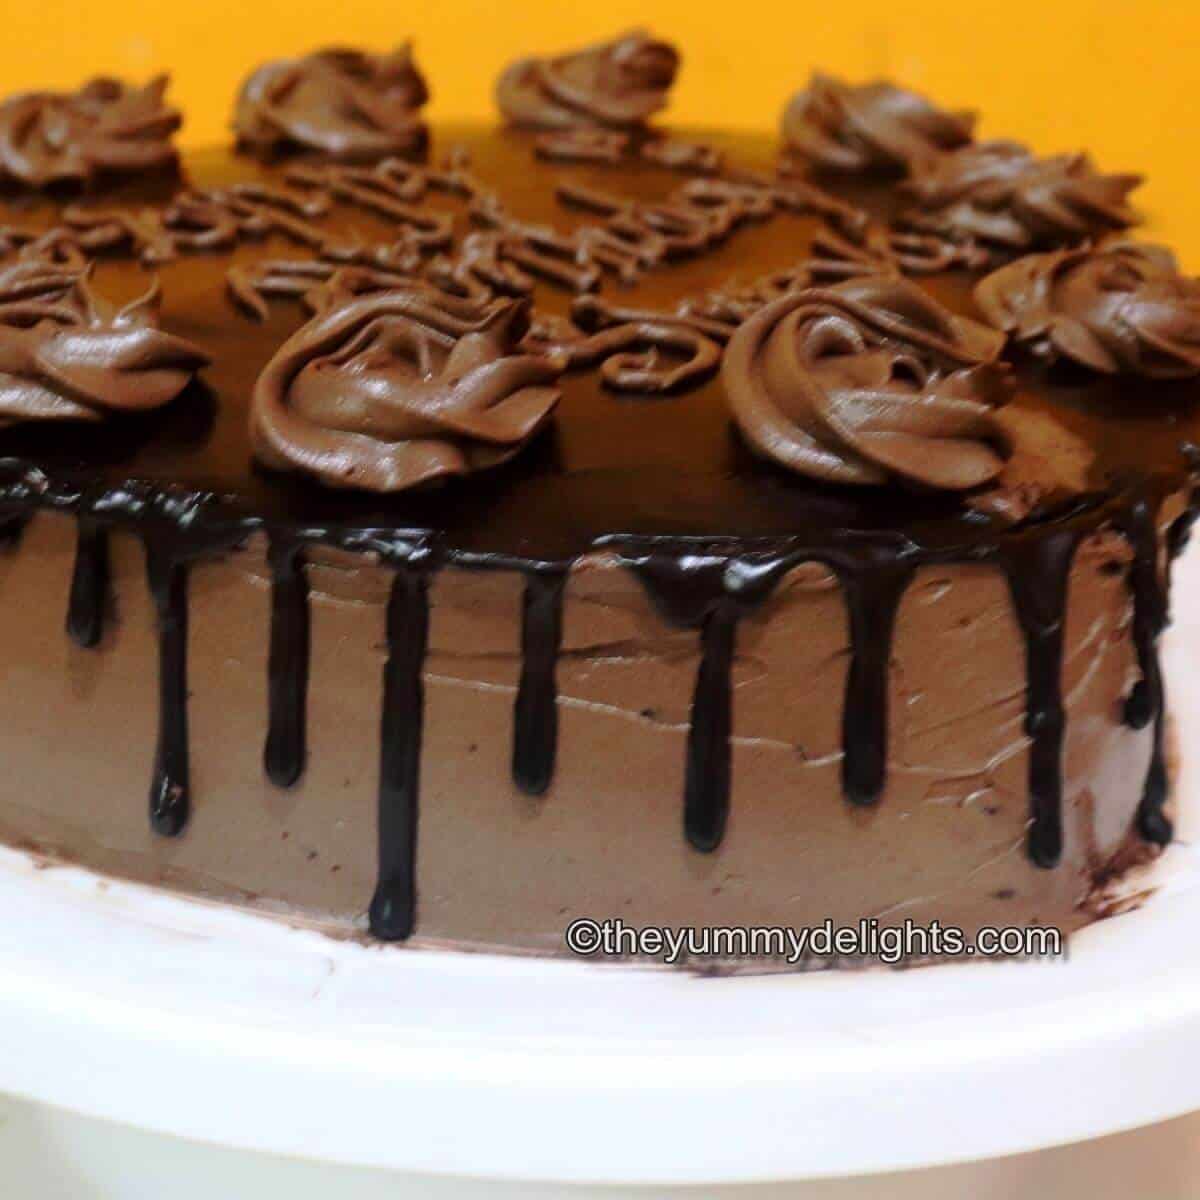
- Once you complete making the drips, pour the chocolate ganache on the top. Spread it evenly. (image 16)
- Keep it in the refrigerator to set for 30 minutes. (image 17)
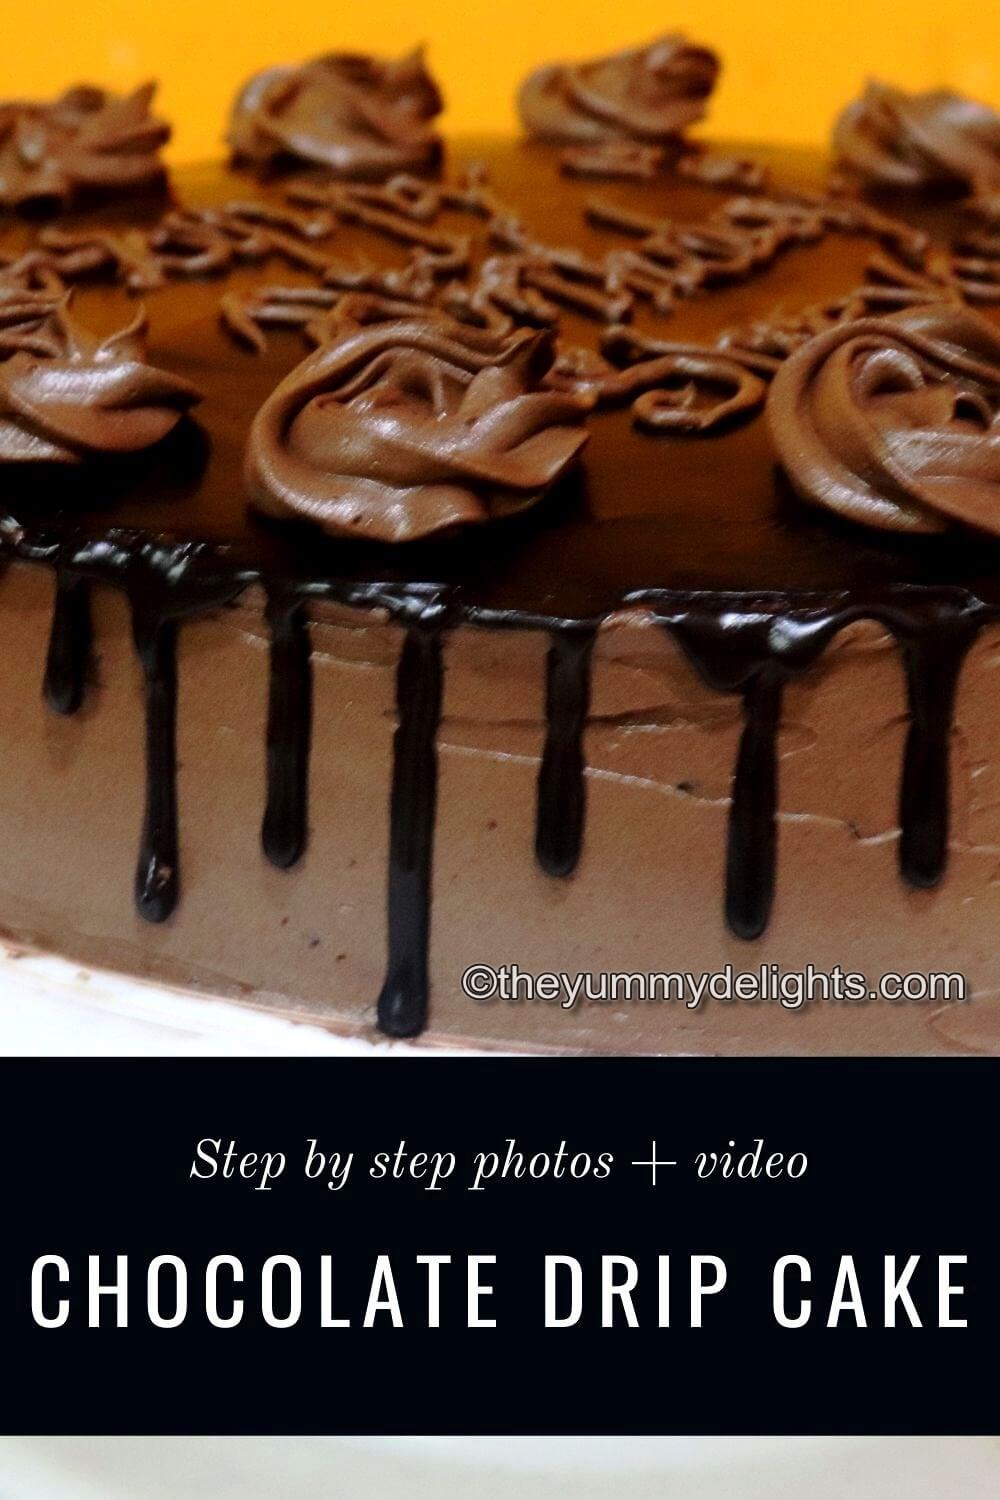
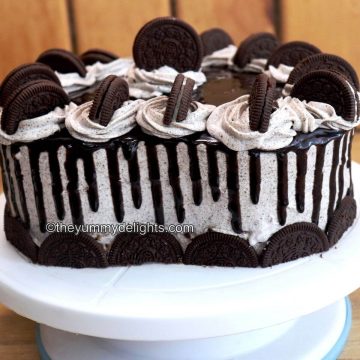
- Decorate the top. I decorated the top with whipped chocolate ganache rosettes. (image 18)
- Chocolate drip cake is ready. Enjoy!
FAQs
The drip is made with chocolate ganache. You can use either chocolate compound or chocolate chips. Melt the chocolate using either the double boiler method or microwave. When the chocolate melts, remove it from heat.
Pour heavy cream or whipping cream on it and mix when the chocolate is still warm. Check the consistency, it should be of pouring consistency. Let it cool down a little bit. Now you can create your own chocolate drips.
It is either because the ganache is hot, or you have added more heavy cream to the chocolate than required. To fix this problem, let the ganache cool down a little and then start making the drips. Or add more melted chocolate to the ganache and mix.
Yes, it will. If you are refrigerating the cake then take it out at least 30-45 minutes before serving it. Or until it comes to room temperature.
Related Recipes
- Gravity Cake
- Shinchan Cake
- Doll Cake
- Eggless Black Forest Cake with Chocolate Lace
- Easy Semolina Cake
Variations that you can try
- You can decorate the top with some chocolates.
- Make a vanilla sponge cake.
- Use a buttercream frosting for the cake.
- You can make white chocolate ganache instead of dark chocolate. However, the basic recipe to make ganache differs.
If you make this recipe, please leave a comment and a starred review below.
And, consider following me on social media so we can stay connected. I’m on Facebook, Pinterest, and YouTube!
Recipe Card
Chocolate drip cake recipe (Step by step photos + video)
Video
Equipment
- Piping bag
- Mixing bowl
Ingredients
To make chocolate ganache for frosting:
- 2 cups chopped dark compund chocolate finely chopped
- 2 cup heavy cream sweetened
To make chocolate drip:
- 100 grams dark compund chocolate
- 50 grams heavy cream sweetened
Instructions
Step: 1 Making whipped chocolate ganache
- Heat water in a vessel over low heat.
- Place a heat-proof bowl filled with chocolate over it.
- Keep stirring the chocolate so that the heat distributes evenly.
- Once the chocolate melts, remove it from heat.
- Add heavy cream to warm chocolate (a little at a time) & mix.
- Chocolate ganache is ready. Let it sit for 2 hours at room temperature to set. Or you can make it the day before. Cover the bowl with cling wrap & refrigerate.
- Whip the ganache until it becomes double in quantity and light in color. Whipped chocolate ganache is ready. Set it aside.
Step: 2 Frosting the cake with chocolate ganache:
- Cut the sponge cake in half.
- Apply sugar syrup over it. (Optional).
- Next, apply chocolate ganache and spread it evenly using a palette knife.
- Place the top layer of the sponge cake.
- Again pour sugar syrup over it.
- Apply chocolate ganache on the top layer and on the sides of the cake.
- Let it sit in the refrigerator for an hour.
Step: 3 Making the chocolate drips
- In a small bowl, meltdark chocolate compound. You can use the same method we use to make the chocolateganache.
- Remove from heat. Add heavy cream to it and mix. It should have free-flowing consistency.
- Fill it in the piping bag.
- Start making the drips. First, make a smaller drip. For smaller drips apply less pressure on the piping bag to release the chocolate and for longer drips apply more pressure.
- Once you complete making the drips, pour the chocolate ganache on the top. Spread it evenly.
- Keep it in the refrigerator to set for 30 minutes.
- Decorate the top. I decorated the top with chocolate ganache rosettes.
- Chocolate drip cake is ready. Enjoy!
Notes
- Add heavy cream only after the chocolate is completely melted.
- Make sure the heavy cream is at room temperature when you add it to the melted chocolate.
- If the heavy cream is cold (taken straight out of the refrigerator) then it will set the chocolate and you will find it difficult to mix.
- To create chocolate drip - Mix cream to the melted chocolate. Fill it in the piping bag. Make sure the chocolate ganache is warm and not hot. If it is hot then it will not set. It will be runny and will come all the way down.
- If the chocolate drip is thick then add some more cream to it. Be careful and add only 1 teaspoon cream at a time and mix. Check the consistency. Then start making the drip.
- If the chocolate drip is too runny then add some more melted chocolate to it and mix. In this case, also make sure the chocolate drip is not too hot.
- Most important tip - The cake should be cold enough. Take it out from the refrigerator when you are ready to make the drips. When the dripping chocolate comes in contact with the cold cake then the drips set immediately.
Nutrition
Nutrition information is automatically calculated, so should only be used as an approximation.


Azim
This chocolate drip cake looks absolutely divine! The step-by-step photos are really helpful, and the video adds a great touch for visual learners. Can’t wait to try making this for my next celebration! Thank you for sharing such a detailed recipe!