Naan Bread Recipe with Yogurt
This homemade naan bread is made with simple ingredients like flour, yogurt and a few pantry staples. Learn how to make this fluffy Indian flatbread (no yeast recipe) with our easy-to-follow garlic naan recipe, perfect for cooking on a tawa or stovetop.
Servings: 6 Naan
Calories: 130kcal
Equipment
- 1 large mixing bowl
- 1 cast iron skillet or non-stick pan
Ingredients
For the Naan dough
- ½ cup full fat yogurt or greek yogurt (do not used flavored yogurt)
- ¼ cup milk luke warm
- 1 tablespoon oil any cooking oil with neutral flavor
- 2 teaspoon sugar
- 2 cups all-purpose flour (Maida)
- ½ teaspoon salt
- ½ teaspoon baking powder
- ¼ teaspoon baking soda
Other ingredients
- (Kalonji) Nigella seeds (optional)
- coriander leaves
- 4-6 finely chopped garlic cloves
Instructions
- Prepare your naan dough: In a large mixing bowl, combine yogurt, lukewarm milk, oil, and sugar. To this mixture, add flour, salt, baking powder, and baking soda.
- Combine all the ingredients. Initially it will not bind together. Now gradually add 1-2 teaspoons of lukewarm milk to the dough and knead until it comes together like a big ball. Avoid adding too much milk at once to prevent a sticky mess. Once the dough ball is formed, add 1 teaspoon of oil all over the dough.
- Knead the dough: Knead for 10 minutes or until the dough becomes smooth and elastic. Initially, the dough will be sticky and will not stretch. However, as you continue kneading, it will gradually become smoother, less sticky, and stretchier. At this point, stop kneading (don’t ovedo it otherwise the dough will be hard). It's only a 10-minute workout, and believe me, the result is fabulous. Cover and let it rest for at least 45 minutes to maximum 2 hours. Not kneading the dough will result in dense and heavy Naan bread.
- Roll the naan dough. After two hours, knead the dough once and divide it into six equal-sized balls. Smooth the top surface of the ball by tucking the edges of the dough into the center. Watch the video for more clarity. On a lightly floured surface, roll out each ball into a thin oval or circle, about ¼ inch thick. Sprinkle with kalonji or nigella seeds (optional), coriander leaves, and garlic. Roll the dough lightly once more to stick the toppings.
- Apply water. Brush or lightly sprinkle just the underside of the naan dough with water. It will help to stick the Naan on Tawa (griddle).
- Heat your tawa (cast iron griddle). Preheat your tawa over medium heat. A quick way to check the temperature is to sprinkle a few drops of water onto the surface. It should sizzle and evaporate quickly.
- Cook the naan. Carefully place the rolled naan dough on the tawa (cast-iron griddle), wet side down. Once it begins to brown and puff up with air pockets, flip it over. For a traditional tandoori char marks, cook it directly over a low, open gas flame. See this process in the images or watch the recipe video. Hold the cast iron tawa with its handle, at some distance, over the low open gas flame, while constantly moving it to cook all sides evenly. If you are using non-stick pan, do not flip it over open flame instead cook the other side as mentioned below.
- Alternatively, flip the naan over on the tawa and cook the other side on the tawa for a few more seconds until char marks appear. Remove it to a plate. Immediately brush it with melted butter. It keeps the naan soft even after hours of cooking.
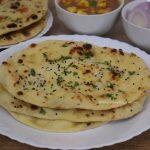
- Enjoy your freshly cooked garlic naan immediately. Pair it with curries, dips, or simply savor it on its own.
Video
Notes
- You can easily double or triple the recipe.
- Addition of milk - Add lukewarm milk to activate the baking powder and baking soda, resulting in softer naan bread. Incorporate the milk gradually (1-2 teaspoons at a time) into the combined dough ingredients, kneading until a cohesive dough forms.
- Avoid adding excessive milk (I made this mistake many times), as this can create a sticky mess. If the dough becomes too sticky, incorporate additional flour, one tablespoon at a time. Don’t add too much flour it will result in tough Naan.
- Kneading the dough - It helps to develop the gluten in the flour resulting in smooth, pliable dough that is easy to shape and gives the naan its elastic texture. It incorporates air into the dough which leads to a lighter and fluffier naan. I've tried making naan without kneading, and the difference in texture and rise is quite noticeable.
- Resting the Dough - While yogurt offers a faster rise than yeast, a 1-2 hour rest can still be beneficial for optimal results in naan dough. Resting allows the gluten to relax after kneading, making it easier to handle and shape. The resting period gives time to meld the flavors in the dough. A longer rest of 2 hours can lead to a slightly chewier naan compared to a shorter rest of 45 minutes to 1 hour.
- Cooking on high heat - Cooking Naan bread requires high heat for desirable crunch on the outside while the inside remains soft and airy due to the bread's structure and the short cooking time.
- For the toppings, if you don’t have kalonji or nigella seeds simply skip it. But coriander leaves are a must. You can skip garlic to make butter Naan or plain Naan bread.
- Don't overcook the naan. Once the naan begins to puff up (usually within 60 seconds on a heated tawa), it's time to flip it over. Cook the other side for about 60 seconds more. Look for golden brown spots or char marks as a sign of doneness.
- Flour choice - I have made Naan with all-purpose flour, wheat flour, and a combination of both. I found that all-purpose flour produced the best Naan bread. When wheat flour is added, the Naan becomes slightly harder compared to using only all-purpose flour. However, for a more nutritious option, a combination of both flours in a ratio of 1:1 works well. I wouldn't recommend making Naan solely with wheat flour.
Nutrition
Calories: 130kcal | Carbohydrates: 24g | Protein: 5g | Fat: 2g | Saturated Fat: 1g | Cholesterol: 4mg | Sodium: 301mg | Potassium: 65mg | Fiber: 1g | Sugar: 3g | Vitamin A: 37IU | Calcium: 66mg | Iron: 2mg